Agent Context
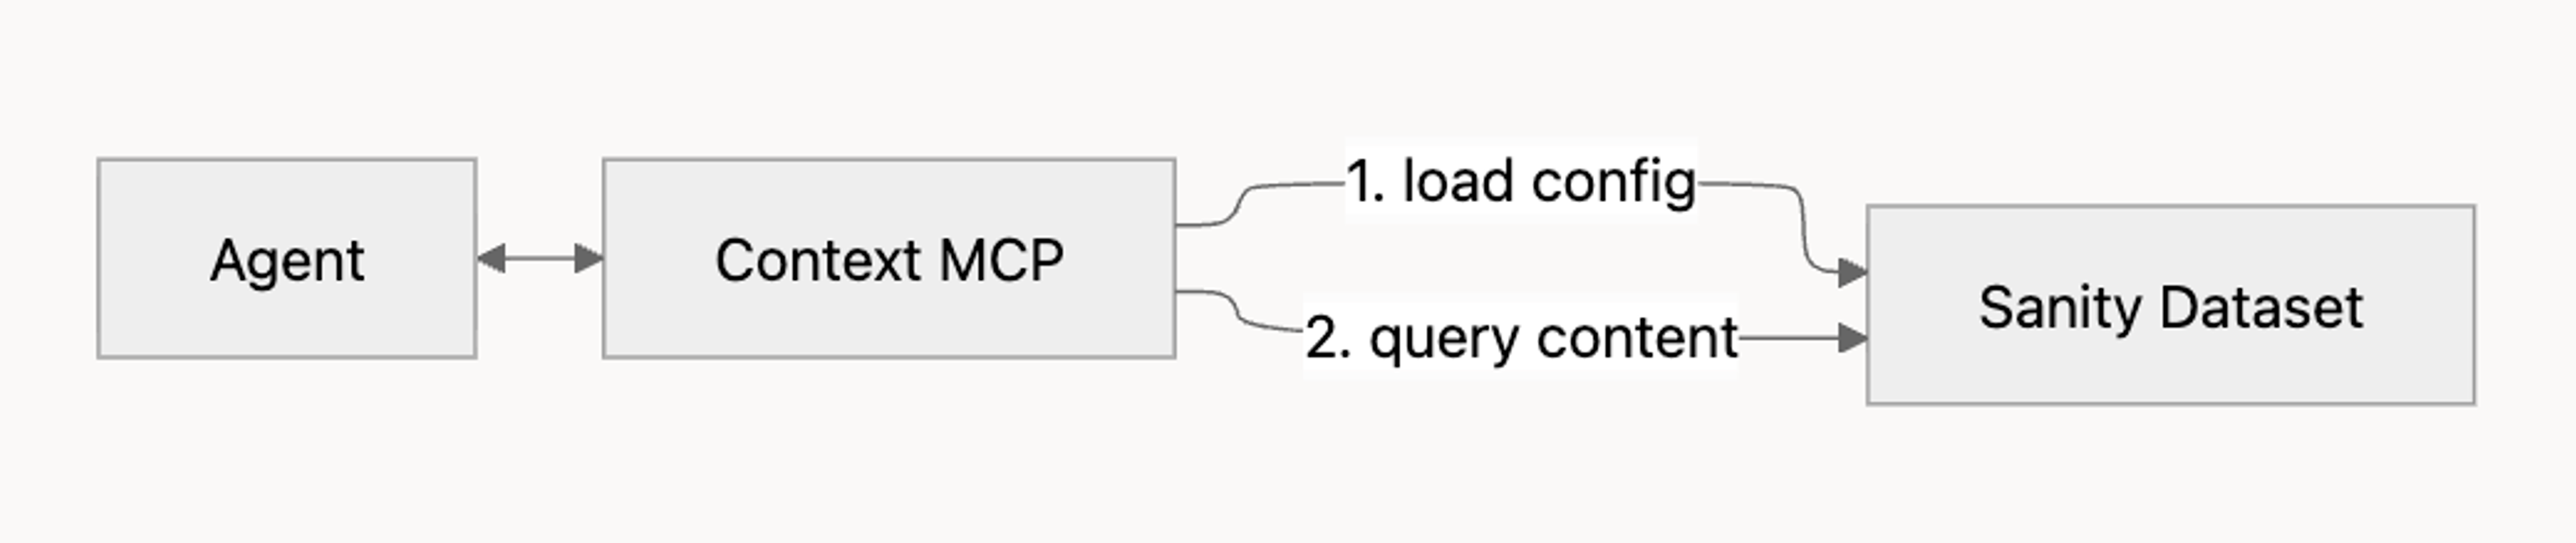
Agent Context lets AI agents read and query Sanity content via MCP. It's schema-aware: agents can query fields, follow references, and use semantic search.
Agent Context vs MCP server
Sanity offers two MCP servers for different use cases. The Sanity MCP server is a tool that gives AI agents in tools like Cursor, Claude Code and v0 full access to your Sanity workspace: querying content, managing releases, deploying schemas, and more.
Agent Context is for production agents that serve your users. It provides read-only, scoped access to a single dataset, configured via an Agent Context document in Studio (recommended) or query parameters. You use it to power search, support bots, and other content-driven features in your application.
Agent Context is for building applications on top of Sanity content. If you're looking for Sanity's built-in AI assistant for content operations, see Content Agent. For AI-assisted development in tools like Cursor or Claude Code, see the Sanity MCP Server.
Quick start
- Install the skill:
npx skills add sanity-io/agent-context --all
pnpm dlx skills add sanity-io/agent-context --all
yarn dlx skills add sanity-io/agent-context --all
bunx skills add sanity-io/agent-context --all
- Prompt your AI assistant to use the skill based on what you want to build:
- Adding an agent to an existing application
- Building a new application with agent capabilities
- Setting up Agent Context for a specific use case
Use the create-agent-with-sanity-context skill to help me build an agent in this project- Follow the guided setup to achieve your desired configuration.
For more detail, see Using the skill. For manual setup without the skill, see Manual setup. For a practical example, see AI shopping assistant template.
What's included?
Agent Context MCP
The Agent Context MCP is a hosted MCP server that lets AI agents read and query a Sanity dataset in a structured, schema-aware way.
It provides:
- Tools that let an agent understand your schema and query content
- Optional content filtering to limit what the agent can access
- Optional semantic search (when embeddings are enabled)
The recommended way to configure Agent Context is with an Agent Context document in your Studio - it lets you manage instructions, content filters, and access scope without touching code. To set this up, see Studio plugin below. You can also pass configuration as query parameters directly in the MCP URL - useful for quick testing or when you don't need Studio-managed configuration. If you pass query parameters alongside a document slug, the parameters take precedence and override the corresponding document settings for that request.
The Agent Context document has the following fields:
name: human-readable nameslug: identifier used when connecting to the MCPinstructions: custom instructions for how AI agents should work with your content, for example, "Always respond in Spanish" or "Focus on product documentation only."groqFilter: optional filter that limits what content the agent can access. GROQ is Sanity's query language. This field takes a filter expression (e.g.,_type == "product"), not a full query (e.g.,*[_type == "product"]). The filter supports standard GROQ expressions including comparisons (==,!=,>,<), logical operators (&&,||), theinoperator, anddefined(). Sub-queries, projections, and ordering are not supported.
Available Tools
Agent Context exposes three tools. These are discovered automatically when you connect an MCP client.
| Tool | Purpose |
|---|---|
| initial_context | Get compressed schema overview (types, fields, document counts) |
| groq_query | Execute GROQ queries against the dataset |
| schema_explorer | Inspect detailed schema for a specific type |
MCP endpoint
The Agent Context MCP server is hosted at
https://api.sanity.io/:apiVersion/agent-context/:projectId/:dataset/:slugWhere:
apiVersion: API version in the formatvYYYY-MM-DD(e.g.,v2024-01-01)projectId: the ID of the projectdataset: the name of the datasetslug: the slug of an Agent Context document which configures the MCP
The slug is optional. If you omit it, the MCP connects directly to your project and dataset - useful for quick testing or when you don't need Studio-managed configuration: https://api.sanity.io/:apiVersion/agent-context/:projectId/:dataset. Use query parameters to pass instructions, groqFilter, and other options instead.
The MCP URL also accepts query parameters to customize the request. These are runtime options and are not stored in the Agent Context document:
| Parameter | Description |
|---|---|
| instructions | Custom instructions. Overrides instructions from the Agent Context document for this request. |
| perspective | Content perspective for GROQ queries. Defaults to published. |
| groqFilter | Overrides groqFilter from the Agent Context document for this request. |
You can test the endpoint directly with curl or any HTTP client:
curl -X POST \
  https://api.sanity.io/:apiVersion/agent-context/:projectId/:dataset/:slug \
  -H "Authorization: Bearer <SANITY_API_READ_TOKEN>" \
  -H "Content-Type: application/json" \
  -d '{"method": "tools/list"}'
This returns the available MCP tools without requiring a specific SDK.
Studio plugin
The agentContextPlugin from the @sanity/agent-context package is a Studio plugin that helps you configure Agent Context. It registers the Agent Context document type and adds a custom input for selecting which document types the agent can access.
Skills
Skills
Skills are modular instructions that expand capabilities for AI agents.
Read more about skills available from Sanity.
Three skills are available to help you build and refine agents using Agent Context:
create-agent-with-sanity-context Connect an existing agent to Agent Context MCP, build a new project from scratch (frontend + Studio), or add an agent to an existing project. Covers installing the @sanity/agent-context Studio plugin, creating an Agent Context document, generating a reference agent, and adding a chat UI.
shape-your-agent Interactive session that helps you craft a system prompt. Walks you through audience, tone, boundaries, and fallback behavior, then produces a focused prompt (typically 200–400 words) tuned for Agent Context MCP.
dial-your-context Interactive session that helps you write the Instructions field for an Agent Context document. The Instructions field covers what the agent can't determine from the schema alone: misleading field names, required filters, non-obvious relationships, useful query patterns.
Prerequisites
Before you begin, ensure you have:
- A Sanity project with content you want the agent to access
- Sanity Studio v5.1.0+ - required for server-side schema, which Agent Context depends on
- Schema deployment - Agent Context reads your schema from the server, not from your local machine. Run
sanity schema deployto push your schema to the Content Lake, or usesanity deploywhich includes schema deployment as part of Studio hosting. See Schema Deployment for details. - A Sanity API read token - create one at sanity.io/manage > Project > API > Tokens
- An LLM API key - from Anthropic, OpenAI, or another provider
- A frontend application (optional) - where your agent will live (Next.js, Remix, etc.). The skill can help set this up if needed.
Get started
There are two paths to get started:
- Using the skill - guided setup that helps you build an agent from scratch
- Manual setup - do the setup yourself without the skill
Using the skill
Best for building a new agent from scratch. The skill guides you through Studio setup, agent implementation, and frontend UI.
- Install the skill:
npx skills add sanity-io/agent-context --all
pnpm dlx skills add sanity-io/agent-context --all
yarn dlx skills add sanity-io/agent-context --all
bunx skills add sanity-io/agent-context --all
- Prompt your AI assistant:
Use the create-agent-with-sanity-context skill to help me build an agent in this project.The skill guides you through:
- Studio setup: install and configure
@sanity/agent-context, then create Agent Context documents and get an MCP URL. - Agent implementation: generate a reference agent implementation (for example Next.js + Vercel AI SDK) that you can adapt to other stacks.
- Frontend UI: if applicable, add a basic UI for interacting with the agent (for example a chat interface).
Manual setup
Use this if you prefer to set up Agent Context manually without the skill.
Ensure you're running Sanity Studio v5.1.0+. Agent Context requires server-side schema, which is only available in v5.1.0+.
Without an Agent Context document
If you don't need to manage configuration from Studio, you can connect directly using https://api.sanity.io/:apiVersion/agent-context/:projectId/:dataset. Use query parameters to pass instructions, groqFilter, and other options.
import {createMCPClient} from '@ai-sdk/mcp'

const url = new URL('https://api.sanity.io/:apiVersion/agent-context/:projectId/:dataset')
url.searchParams.set('groqFilter', '_type == "product"')

const mcpClient = await createMCPClient({
  transport: {
    type: 'http',
    url: url.toString(),
    headers: {
      Authorization: `Bearer <SANITY_API_READ_TOKEN>`,
    },
  },
})- Verify it works by listing the available tools:
const tools = await mcpClient.tools()
console.log(tools)
With an Agent Context document
- Install the
@sanity/agent-contextStudio plugin and add it to your Studio config:
import {defineConfig} from 'sanity'
import {structureTool} from 'sanity/structure'
import {agentContextPlugin} from '@sanity/agent-context/studio'

export default defineConfig({
  // ...
  plugins: [structureTool(), agentContextPlugin()],
})
Optionally, you can customize where the document type appears in the Studio structure using AGENT_CONTEXT_SCHEMA_TYPE_NAME:
// sanity.config.ts
import {defineConfig} from 'sanity'
import {structureTool} from 'sanity/structure'
import {agentContextPlugin, AGENT_CONTEXT_SCHEMA_TYPE_NAME} from '@sanity/agent-context/studio'

export default defineConfig({
	// ...
  plugins: [
    structureTool({
      structure: (S) =>
        S.list()
          .title('Content')
          .items([
            // Filter out agent context document from the default list
            ...S.documentTypeListItems().filter(
              (item) => item.getId() !== AGENT_CONTEXT_SCHEMA_TYPE_NAME,
            ),
            // Add it elsewhere, e.g. after a divider
            S.divider(),
            S.documentTypeListItem(AGENT_CONTEXT_SCHEMA_TYPE_NAME),
          ]),
    }),
    agentContextPlugin(),
  ],
})- Create a new Agent Context document in your Studio and configure it:
- Configure the document fields - see Agent Context document fields above for details on each.
- Publish the document, then copy the MCP URL shown at the top of the form.
- Connect to the MCP URL using any MCP-compatible client, authenticated with your Sanity read token (see Prerequisites). Here's an example using Vercel AI SDK:
import {createMCPClient} from '@ai-sdk/mcp'

const mcpClient = await createMCPClient({
  transport: {
    type: 'http',
    url: 'https://api.sanity.io/:apiVersion/agent-context/:projectId/:dataset/:slug',
    headers: {
      Authorization: `Bearer <SANITY_API_READ_TOKEN>`,
    },
  },
})- Verify it works by listing the available tools:
const tools = await mcpClient.tools()
console.log(tools)
Next steps
Once your agent is connected and returning tools, you can integrate it into your application.
- Build an AI shopping assistant - a walkthrough covering architecture, GROQ-based product search, and content-driven agent configuration.
- AI shopping assistant starter - the complete source code for the above. Next.js, Sanity Studio, Claude, and Vercel AI SDK.
For a guided setup that handles Studio configuration, agent implementation, and frontend UI, see Using the skill.
Security and access
Authentication
Agent Context MCP uses Sanity API tokens for authentication.
- Tokens are passed as Bearer tokens in the Authorization header
- Use a read token - agents only need read access
- Keep tokens server-side in your agent implementation - never expose them client-side
Data access
Agent Context MCP is read-only. Agents can query and retrieve content, but cannot create, update, or delete documents. What agents can access:
- Schema - document types, field definitions, and structure
- Content - published documents in the dataset
- References - agents can follow references between documents
By default, agents only see published documents. Set perspective to drafts to include draft content. The groqFilter field in the Agent Context document controls what content is visible. For example:
_type == "product"- only product documents_type in ["article", "author"]- only articles and authors_type == "product" && public == true- only public products
If no filter is set, the agent can access all published documents the token has permission to read.
Agent Context documents are regular Sanity documents, queryable like any other in your dataset.
Troubleshooting
401 Unauthorized
Your Sanity API token is missing or invalid. Ensure:
- The token has read access to the project
- You're passing it as a Bearer token in the Authorization header
No schema or empty results
Agent Context requires your schema to be available server-side. This happens automatically when your Studio runs, but if it's not working:
- Ensure you're on Sanity Studio
v5.1.0+. - Run
sanity schema deployto push your schema to the Content Lake, or open your hosted Studio in a browser if you haven't deployed manually. - Retry the MCP connection
Tools not appearing
- Check that the MCP URL is correct (project ID, dataset, slug)
- Verify the Agent Context document exists and is published. If you're connecting without a document, omit the slug from the MCP URL.
- Try calling
tools()on your MCP client and log the result
Semantic search not working
Semantic search requires embeddings to be enabled for your dataset. If queries using text::semanticSimilarity aren't returning ranked results:
- Verify embeddings are enabled for your dataset
- Try explicitly adding
?embeddings=trueto the MCP URL to rule out auto-detection issues