Create a recycling bin for deleted documents via Sanity Functions
Help your editors restore deleted documents in a dataset using Sanity Functions and a singleton bin document type.
This developer guide was contributed by Saskia Bobinska (Senior Support Engineer) and Benjamin Weinberger (Support Engineer at Sanity.io).
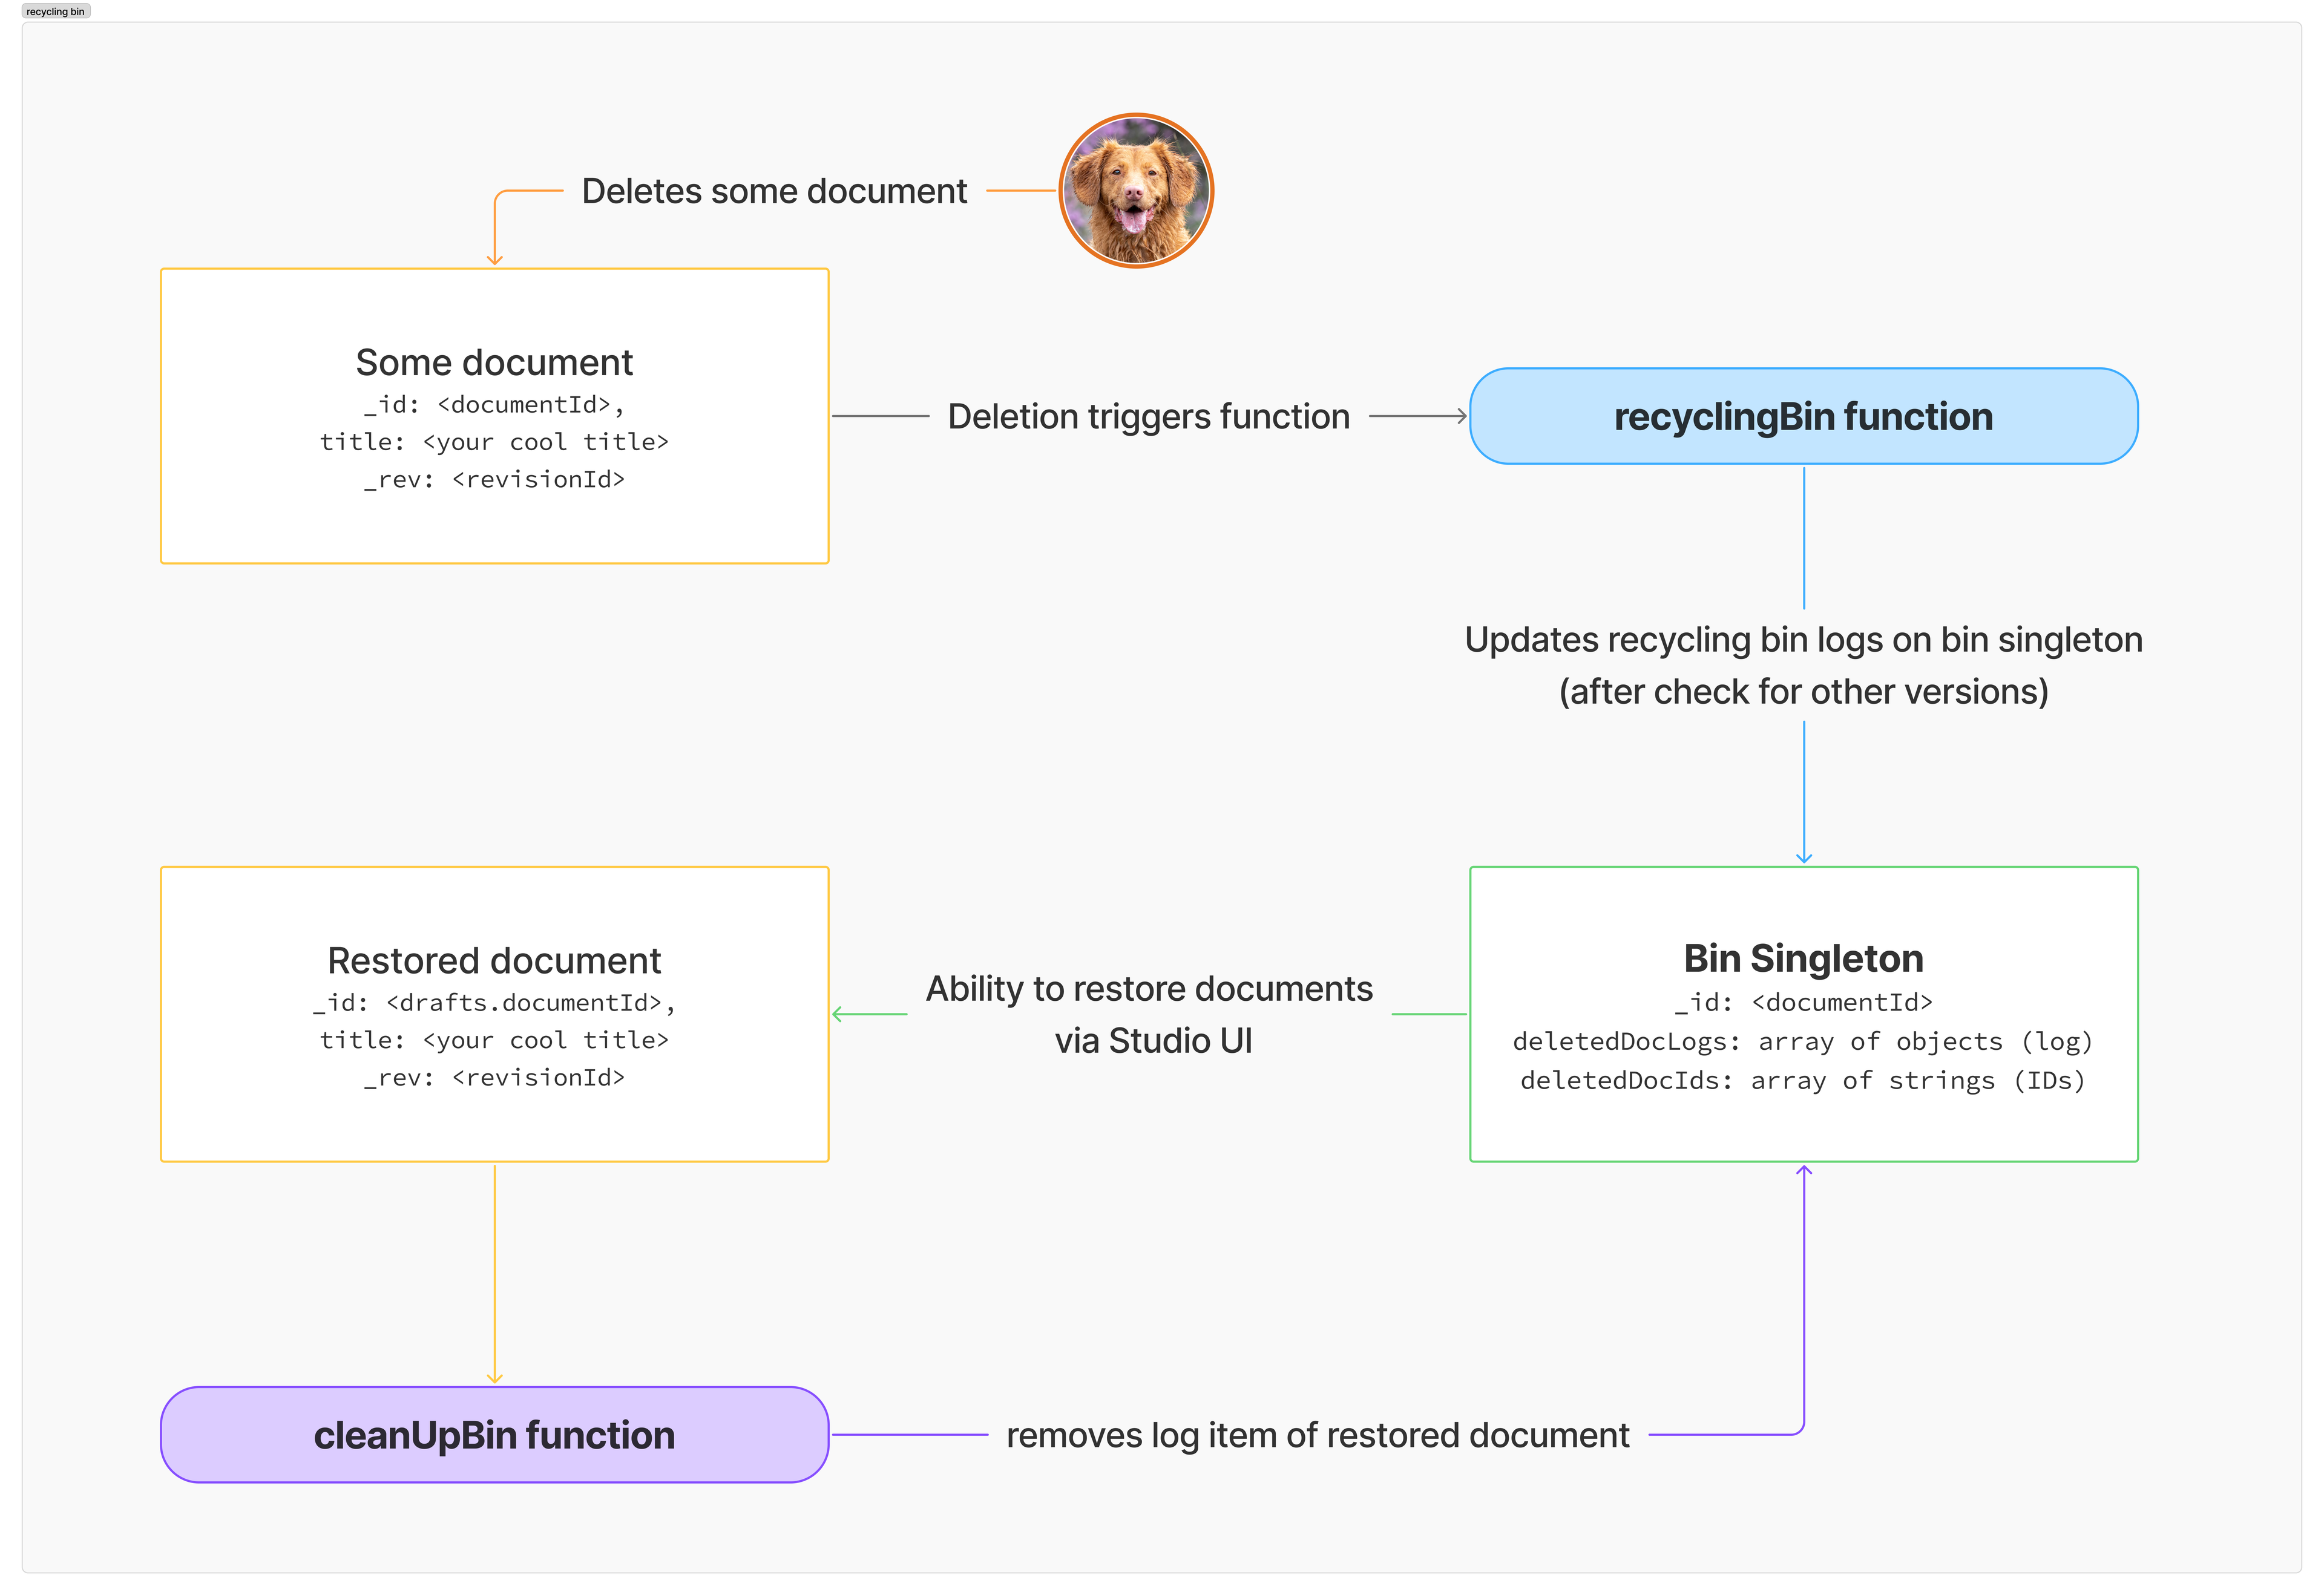
Set up a custom 'recycle bin' logic in your Studio, enabling users to restore deleted documents of a certain type with 2 clicks, using Sanity Functions and a singleton document type, to which we add some custom components using the Component API and the Sanity UI.
In this guide, you will:
- Define a singleton document type and create your singleton document using the CLI.
ThedeletedDocs.bintype will have adeletedDocLogsarray withlogitems (objects) where we store thedocumentId(string),type(string),deletedAt(datetime) anddocumentTitle(string) of each deleted document. There can also be a more straightforward (optional) arraydeletedDocIdswith just the_idstrings. - Set up a Sanity Blueprint and Function which will be triggered upon deletion of a subset of documents. The document handler will then patch the deleted document to the logs of the
binsingleton document. - Create a custom item component for the
logitems, including the intent button for opening the deleted documents in question. - Create a second function, which will remove all document logs, which have been restored already.
In this guide, we will use TypeScript to make the code more reliable, but you can use JavaScript if you prefer. If you don't know how to do this, you can ask in our Discord community for help!
You can find the whole code for the solution with functions here and the older version with webhooks here.
Background: Restoring deleted Documents using the _id
When you delete a document, you can restore it using the unique document _id (either via the History API, or the Studio). In the Studio it is as simple as opening up the document in the structure using the default folder for that particular document type and adding the ID to the URL:
https://<domain>/studio/default/structure/<document type name>;<deleted document _id>Although this trick is helpful, you would still need the know the deleted document _id.
Try this by deleting a document and just using the Go back button in your browser, which will reopen the document you just deleted. Below the form header, you will now see a banner with a button to restore the document at its latest revision.
Intent routing in the Studio
Internally, Sanity typically uses an Intent Link to navigate to a document in the structure. We can use the same intent to open deleted documents and use the restore functionality automatically proposed for any deleted document opened in the Studio.
Although IntentLink is a stable and public part of our API (reference documentation), the IntentButton is not.
We decided to use the IntentButton, because it is what we use internally, but this will mean that things might change, and there is no documentation you can check.
If you are uncomfortable with this, you can instead use a Button component from the Sanity UI and wrap it with an IntentLink.
Workflow
Step 1: Singleton document schema
Create a document type called deletedDocs.bin in your schema folder (in our case we have an additional subfolder called singletons) and add it to your schema as a singleton:
// schemas/singletons/deletedDocBinDocument.ts
import { TrashIcon } from "@sanity/icons";
import { defineArrayMember, defineField, defineType } from "sanity";


export const deletedDocBinDocument = defineType({
  // We use a dot in the _id to make sure this is a private document which cannot be read unless you are authenticated. We chose to do the same in the type name as a personal naming choice.
  name: "deletedDocs.bin",
  title: "Bin: Deleted Document Log",
  type: "document",
  icon: TrashIcon,
  // we want to skip a draft version of this document, so we set this 👇
  liveEdit: true,
  // Fieldset to "hide away" the deletedDocIds array from view unless we need them
  fieldsets: [
    {
      name: "deletedDocIdLogs",
      title: "All Deleted Doc Id Logs",
      options: {
        collapsible: true,
        collapsed: true,
      },
    },
  ],
  fields: [
    // * Main log for restoring documents
    defineField({
      name: "deletedDocLogs",
      title: "Deleted Doc Logs",
      type: "array",
      readOnly: true,
      options: {
        sortable: false,
      },
      description:
        "Log of deleted documents. All items have the revision ID as the _key value and might have already been restored again.",
      of: [
        // optimally you would lift this up into it's own schema type, but for brevity its defined inline 👇
        defineArrayMember({
          type: "object",
          name: "log",
          title: "Log",
          readOnly: true,
          fields: [
            defineField({
              name: "docId",
              title: "Doc Id",
              type: "string",
              validation: (Rule) => Rule.required(),
            }),
            defineField({
              name: "deletedAt",
              title: "Deleted At",
              type: "datetime",
              validation: (Rule) => Rule.required(),
            }),
            defineField({
              name: "type",
              title: "Type",
              type: "string",
            }),
            defineField({
              name: "documentTitle",
              title: "Document Title",
              type: "string",
              validation: (Rule) => Rule.required(),
            }),
            defineField({
              name: 'deletedBy',
              title: 'Deleted By',
              type: 'string',
            }),
          ],
        }),
      ],
    }),
    // Backup of all deleted doc ids -> optional and not used but can be useful to track
    defineField({
      name: "deletedDocIds",
      title: "Deleted Doc Ids",
      type: "array",
      readOnly: true,
      options: {
        sortable: false,
      },
      fieldset: "deletedDocIdLogs",
      of: [
        defineArrayMember({
          name: "deletedDocId",
          type: "string",
          readOnly: true,
          validation: (Rule) => Rule.required(),
        }),
      ],
    }),
    // title for the document (will be set during creation via CLI)
    defineField({
      name: "title",
      title: "Title",
      type: "string",
      hidden: true,
    }),
  ],
});
We set all arrays to readOnly and also hide away the title field since we will set the title in the next step and only need it for a better UI.
In addition we disabled sorting for arrays to have a cleaner look.
Why are all array item fields required?
When the fields are set to required, you can find errors in the data via the validation CLI command. Since things can always go wrong, adding validation rules can make your debugging life much easier!
Custom TypeScript interface for the deletedDocLogs items
As we always want to make the TypeScript Dogs happy, we need to extend the Sanity ObjectItem with our data keys.
Add the custom interface to the schema definition or a separate types file.
// import ObjectItem from sanity

export interface LogItem extends ObjectItem {
  docId: string
  deletedAt: string
  type: string
  documentTitle: string | 'Unknown 🥲'
  deletedBy?: string
  revisionId: string
}
Create a singleton document via the CLI
For the next step, we will create a private document by using a dot in _id. Our personal choice was to use the same logic in the _type name, but you can use a name without a dot if you want to.
At the root of your project, create a newBinSingleton.json and add this data to it:
{
  "_id": "deletedDocs.bin",
  "_type": "deletedDocs.bin",
  // feel free to add your own title
  "title": "Bin: Deleted Document Logs"
}
Next, you need to open your terminal in the root of the project folder and create a document via the CLI:
$ sanity documents create newBinSingleton.json

// or if you dont have @sanity/cli installed globally
$ npx sanity documents create newBinSingleton.json
🥳 Now, there should be a singleton document visible in your structure.
Step 2: Adding custom components
Now we are ready to give our arrays some bling and add custom input components 💅.
We will:
- Remove the Add Item buttons from the arrays (go to section).
- Add custom components:
DeletedDocIdInputComponent.tsx: input component fordeletedDocIdsarray (go to section).DeletionLogItemComponent.tsx: item components forlogobjects in thedeletedDocLogsarray (go to section).
Remove the Add Item buttons from arrays
Because we don't need a UI for adding new items to any of our arrays, we will not only set them to readOnly: true, but also remove the buttons under the inputs by adding custom input components.
In those components, we define that we want to render out the default inputs (by using props.renderDefault from the Component API) minus the arrayFunctions (which will render out the button to add new items to arrays).
import { Stack } from '@sanity/ui'
import { ComponentType } from 'react'
import { ArrayOfObjectsInputProps } from 'sanity'

/** ### Array Input Component without any array functions (like "Add Item" button)
 */
export const DeletionLogInputComponent: ComponentType<ArrayOfObjectsInputProps> = (props) => {
  return (
    <>
      <Stack space={4}>
        {/* Remove the Add Item button below the Array input */}
        {props.renderDefault({ ...props, arrayFunctions: () => null })}
      </Stack>
    </>
  )
}
// in your schema definitions for both array fields we need to customise the input components
// * Main log for restoring documents
defineField({
name: 'deletedDocLogs',
title: 'Deleted Doc Logs',
type: 'array',
components: {
input: DeletionLogInputComponent,
},
//...
// * Backup of all deleted doc ids
defineField({
name: 'deletedDocIds',
title: 'Deleted Doc Ids',
type: 'array',
components: {
/* Remove the `Add Item` button below the Array input */
input: (props: ArrayOfPrimitivesInputProps) =>
props.renderDefault({ ...props, arrayFunctions: () => null }),
},
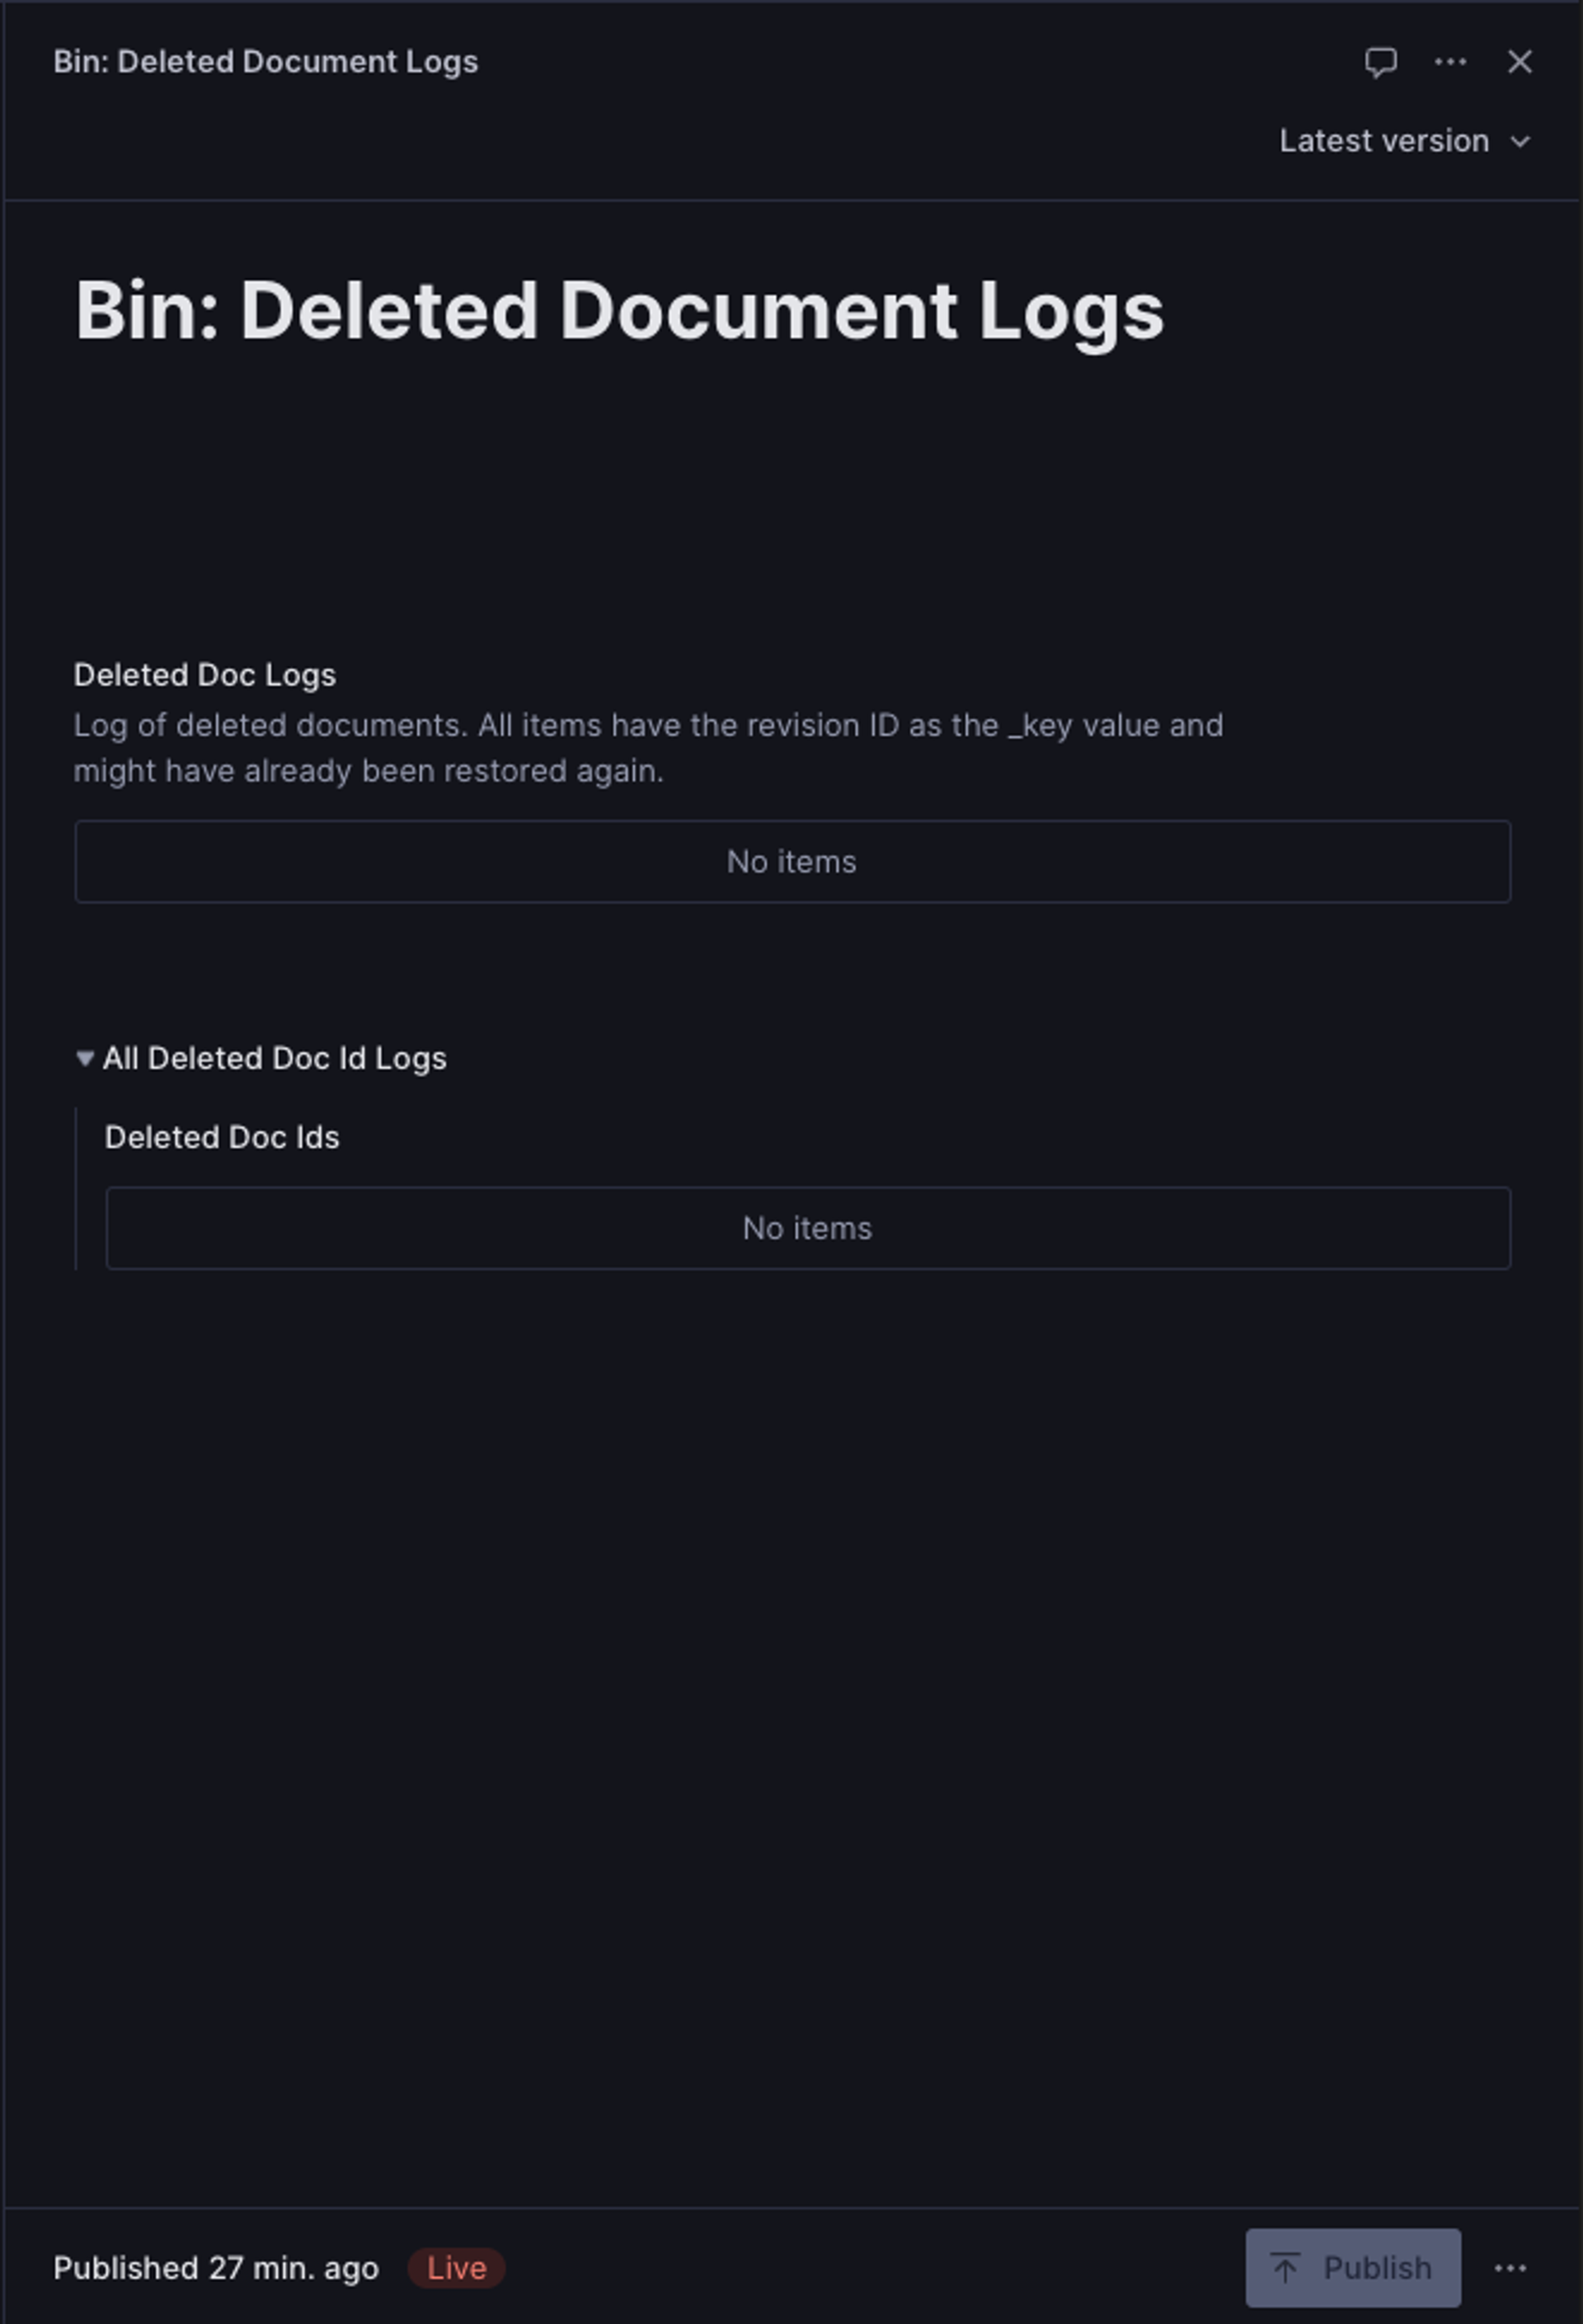
// ...Your bin document should look like this now:
Custom input component for the simple (optional) deletedDocIds array items
Add a file DeletedDocIdInputComponent.tsx for the simple string items and add the component to your deletedDocIds array member string field.
// in DeletedDocIdInputComponent.tsx
import { Card, Flex, Text } from '@sanity/ui'
import { ComponentType } from 'react'
import { StringInputProps } from 'sanity'

/** ### String Input Component for `deletedDocIds` items
 */
export const DeletedDocIdInputComponent: ComponentType<StringInputProps> = (
  props,
) => {
  return (
    <Flex
      justify={'space-between'}
      align={'center'}
      gap={2}
      paddingLeft={2}
      paddingY={2}
    >
      <Card>
        <Text>{props.value}</Text>
      </Card>
    </Flex>
  )
}
Then add the custom input component to the deletedDocIds array by adding this snippet to the deletedDocId array member:
// ...
defineArrayMember({
name: 'deletedDocId',
type: 'string',
readOnly: true,
validation: (Rule) => Rule.required(),
components: {
input: DeletedDocIdInputComponent,
},
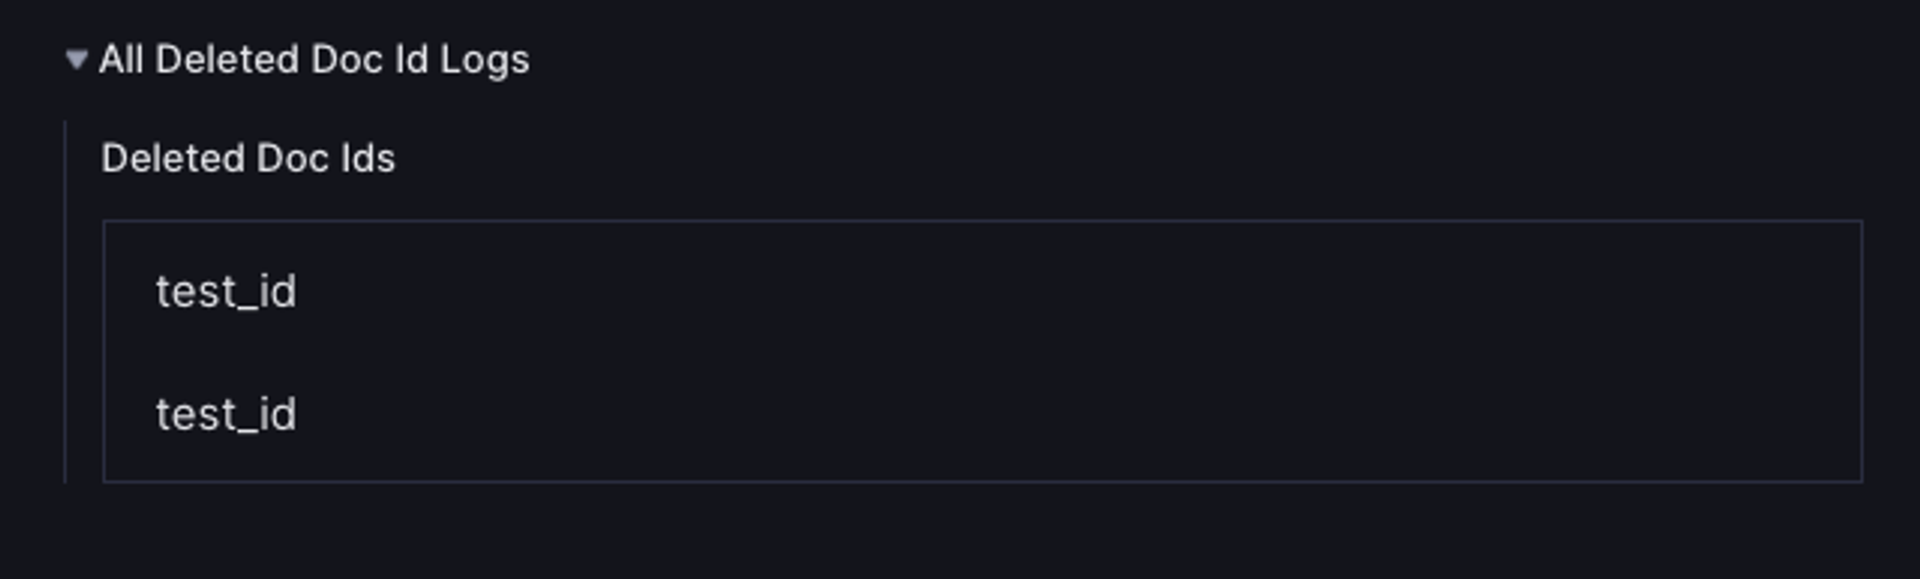
})Your field should look like this now
Custom item component for the log objects (deletedDocLogs array members)
Now that we have the easy part behind us, we can dive deeper into the restoring functionality itself.
First, we need to create a file DeletionLogItemComponent.tsx and override the default preview since we do not want to use the array for editing the log object values, but only display each deletion and add a button which will lead us to the deleted document in the structure, where we can restore it.
// DeletionLogItemComponent.tsx
import { SanityUser } from '@sanity/client'
import { RestoreIcon } from '@sanity/icons'
import { Card, Flex, Stack, Text } from '@sanity/ui'
import { ComponentType, useEffect, useState } from 'react'
import { IntentButton, ObjectItemProps, useClient } from 'sanity'
import { apiVersion } from '../../lib/api'
import { LogItem } from '../../schemaTypes/singletons/deletedDocBinDocument'
import User from './User'

/** ### Array Item Component for each log entry
 *
 * with Intent Button to open the document and restore it
 */
export const DeletionLogItemComponent: ComponentType<ObjectItemProps<LogItem>> = (props) => {
  // * Get the value from the props
  const value = props.value
  // * Set up user client to get the user name of the user who deleted the document
  const client = useClient({ apiVersion }).withConfig({ withCredentials: true })
  const [user, setUser] = useState<SanityUser | undefined>()

  useEffect(() => {
    // * Get the user name of the user who deleted the document
    value.deletedBy &&
      client.users
        .getById(value.deletedBy)
        .then((user) => {
          setUser(user)
        })
        .catch((error) => {
          console.error('Error fetching user:', error)
        })
  }, [])

  // * Format the date to be nice and universal
  const date = new Date(value.deletedAt)
  // Get full month name in English (change 'en' to `undefined` to use runtime locale)
  const monthName = date.toLocaleString('en', { month: 'long' })
  const formattedDate = `${date.getDate()}. ${monthName} ${date.getFullYear()}`

  return (
    /* only display a border top, if it's not the first one 💅 */
    <Card borderTop={props.index > 0}>
      {/*
       * * * Flex container for "custom" item preview and Intent Button */}
      <Flex justify={'space-between'} align={'center'} gap={2} paddingX={4} paddingY={4}>
        {/*
         * * * Custom item preview with the document title, type and date */}
        <Stack space={3}>
          <Text weight="semibold">{value.documentTitle}</Text>

          <Text muted size={1}>
            Type: {value.type}
          </Text>

          <Text muted size={1}>
            Deleted: {formattedDate}
          </Text>
          {user && <User {...user} />}
          <Text muted size={0}>
            ID: {value.docId}, Revision: {value.revisionId as string}
          </Text>
        </Stack>
        {/*
         * * * Intent Button */}
        {value.docId && (
          <IntentButton
            icon={RestoreIcon}
            tone={'positive'}
            mode="ghost"
            intent="edit"
            params={{
              type: value.type,
              id: value.docId,
              revision: value.revisionId,
            }}
            text="Open to restore"
            tooltipProps={{
              placement: 'top',
              content: 'You can restore this document after opening it',
            }}
          />
        )}
      </Flex>
    </Card>
  )
}
With this item component in our pockets, we still have to add it to our log object array members:
// Add this to your `log` object, in your `deletedDocLogs` array
components: {
item: DeletionLogItemComponent,
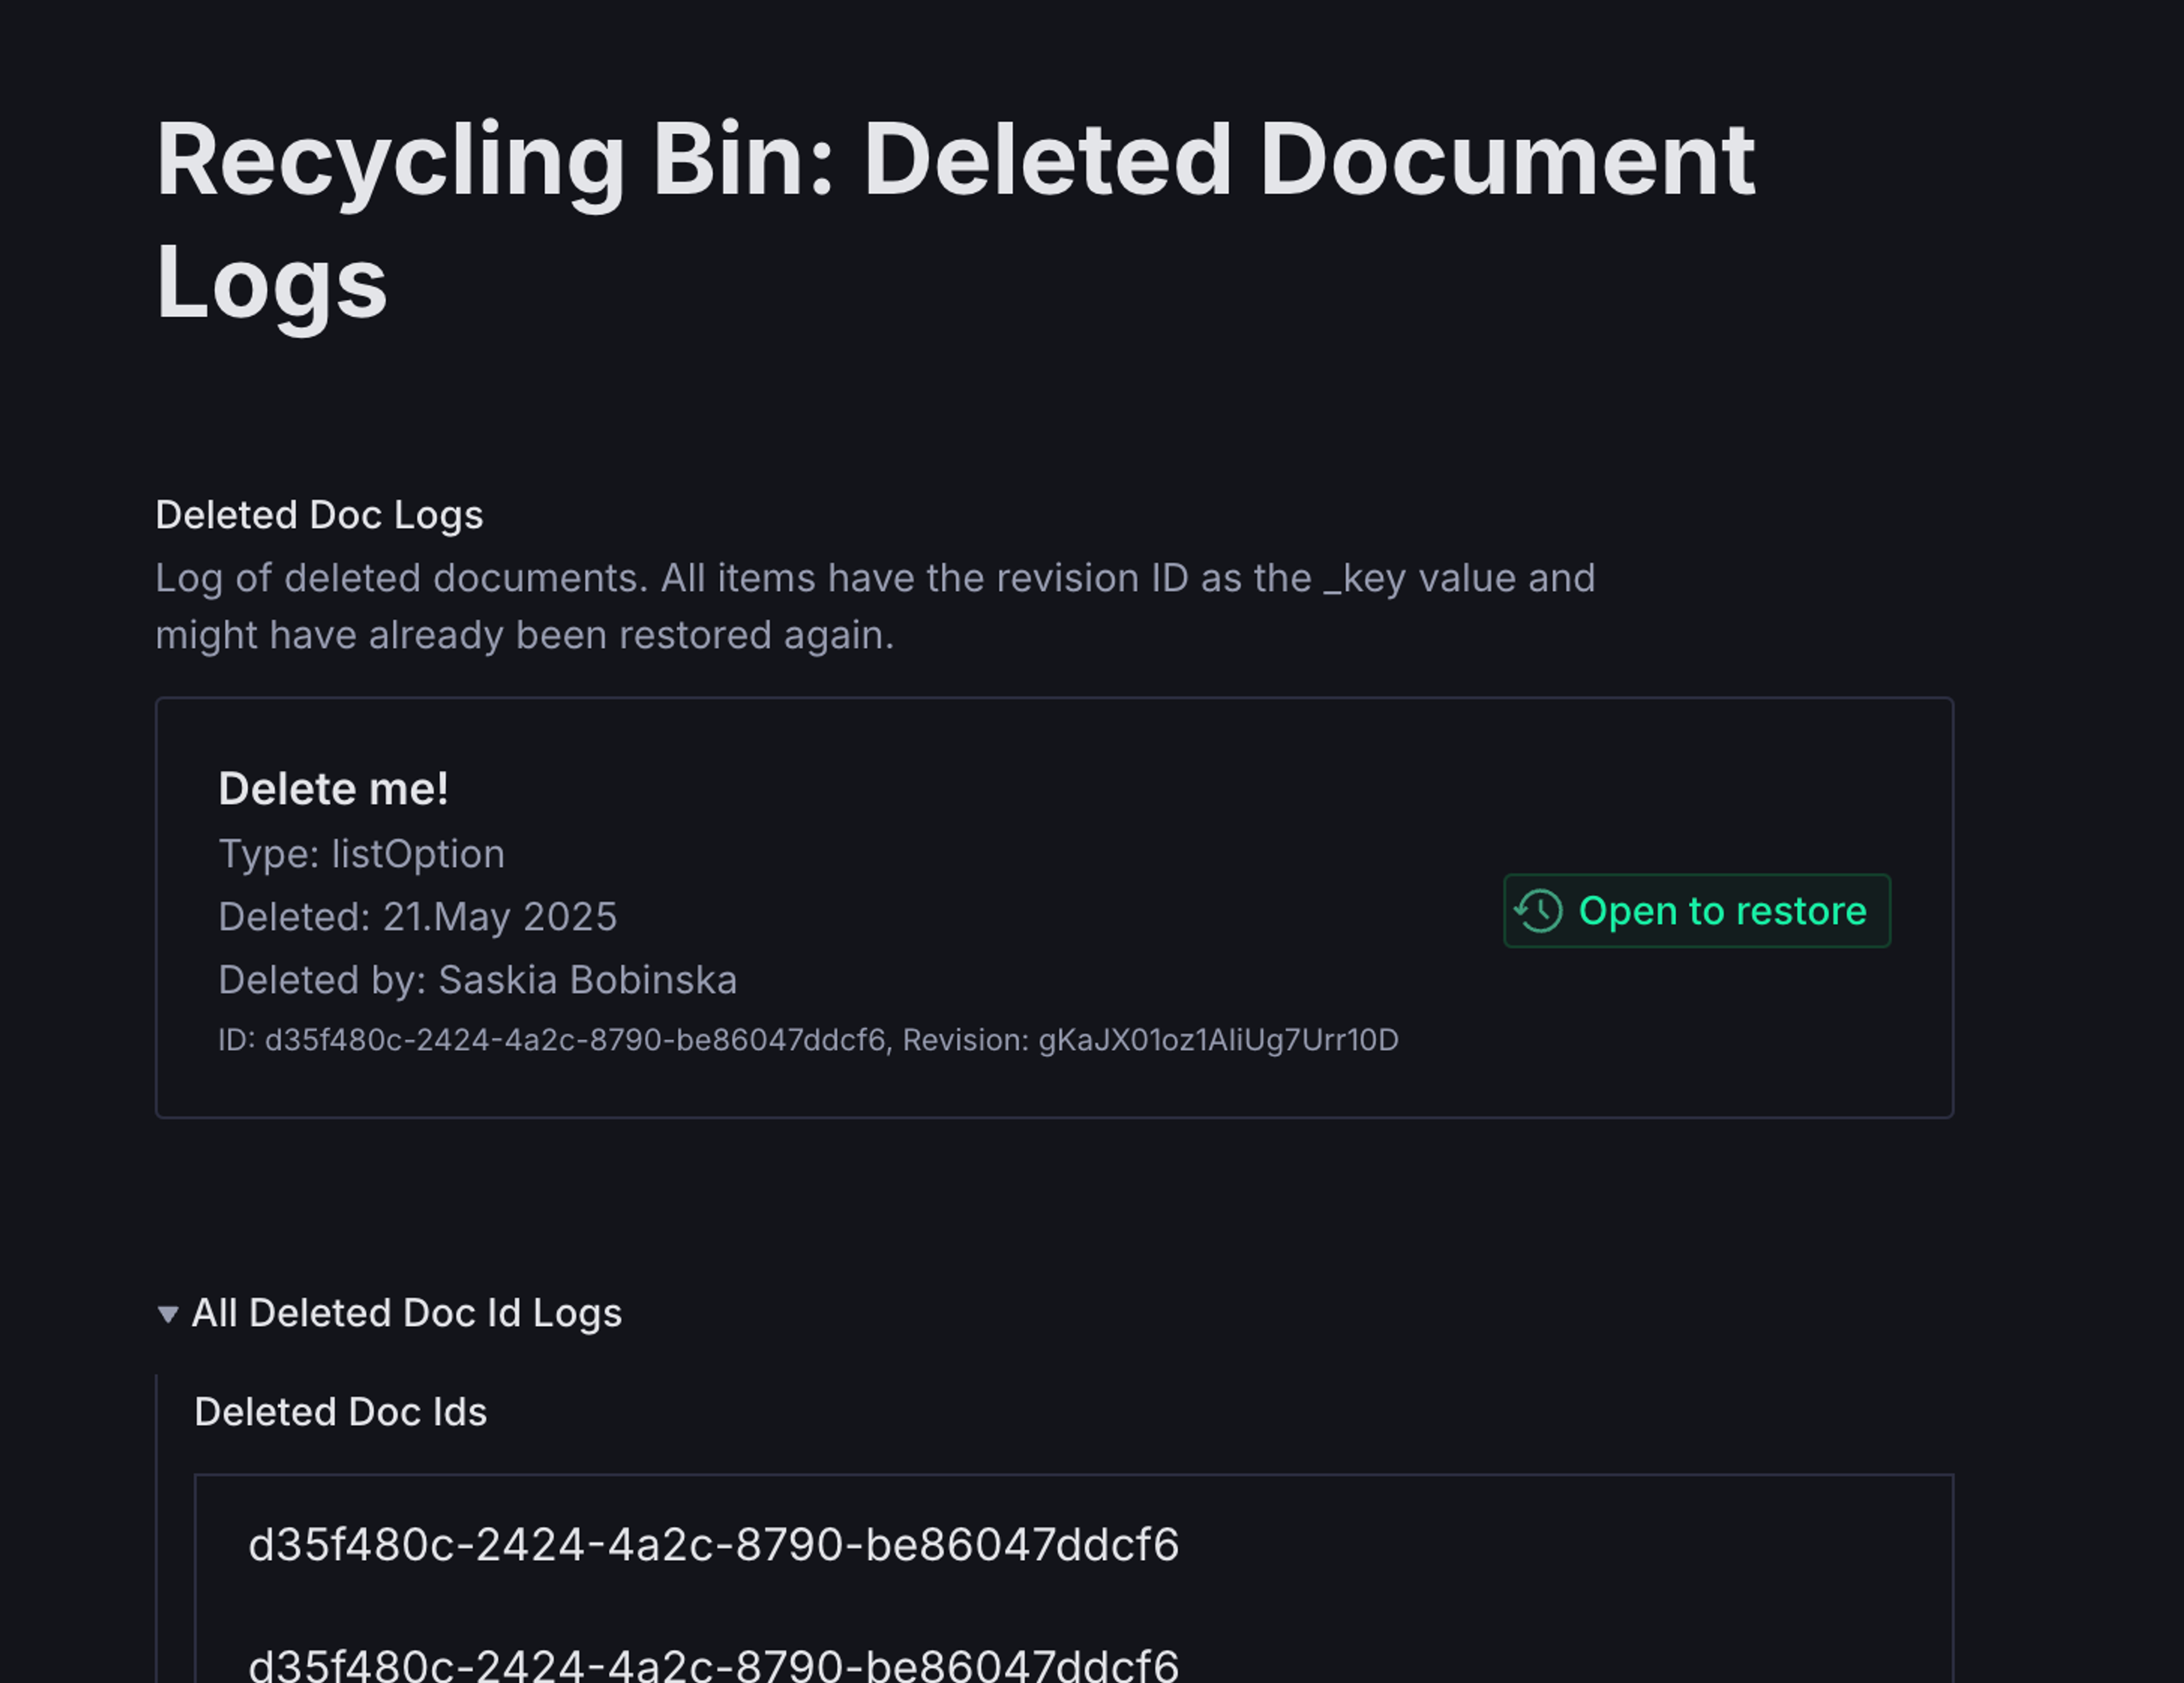
},Very good, our document should look like this now 💅: Super fancy and easy to use!
Step 3: Setting up your Blueprint and Functions
Functions and Blueprints are a new feature for all Sanity projects which allow you to create infrastructure as code—which means you can automate workflows via code directly and deploy those to the Sanity infrastructure. No more need for custom API endpoints or other external server functions.
If you haven’t tried them before, please make sure to read the docs and have a look at our 101 YouTube video and especially the Sanity Learn module.
Use CLI to create both a blueprint and functions
You can follow the Sanity learn module to initialize and add a blueprint and function via the CLI or follow the Functons quick start.
You will need 2 functions:
recyclingBinadds logs for every deleted document.cleanUpBinLogsremoves the recreated documents from the logs.
You can also use Blueprint Stacks if you’re working with multiple teams or environments.
Initialize each function, add them to your blueprint, and you should now have these files / folders in your project root:
└── functions/
  └── recyclingBin/
    └── index.ts
  └── cleanUpBinLogs/
    └── index.ts

└── sanity.blueprints.ts (you can choose another format of course)
While you’re in the CLI, now is a good time to install two dependencies you’ll need for the functions. They’ll both use the Sanity client and the id-utils helper library.
npm install @sanity/client @sanity/id-utils
pnpm add @sanity/client @sanity/id-utils
yarn add @sanity/client @sanity/id-utils
bun add @sanity/client @sanity/id-utils
Document handler and blueprint resource for recyclingBin function
Now that you’ve created the overall infrastructure, let’s start setting up our resource and document handlers.
While the CLI gives you a resource for your blueprint for each function we need to modify it to fit our needs.
// in the resource array

defineDocumentFunction({
  name: 'recyclingBin',
  type: 'sanity.function.document',
  src: './functions/recyclingBin',
  event: {
    // This function is triggered when a document is deleted
    on: ['delete'],
    // we can include drafts but versions are not relevant here
    includeDrafts: true,
    includeAllVersions: false,
    // we need to narrow down which documents can trigger the function -> DO NOT RUN THIS ON ALL DOCUMENTS
    filter: '_type in ["language", "listOption", "page"]',
    projection: '{ _id, _type, "rev": _rev, "deletedAt": now(), "deletedBy": identity(), "documentTitle": coalesce(title, name) }',
  },
}),
High traffic datasets & drafts
If you have a high traffic dataset you should not enable these functions for drafts.
Since invocations are metered this can ramp up quickly and hit technical limits in our infrastructure. Please make sure to adjust the blueprint resources according to YOUR situation and need!
Let’s have a closer look at the filter and projection.
The filter needs to be as narrow as possible for any function or webhook. In this case we only want to trigger it for those document types that should be restorable, in my case thats language, listOption and page, but you have to add yours.
The projection defines, which values should be passed down from the trigger-document to the document handler of your function. This is particularly important for all deleted documents, since you will not be able to directly query them anymore. In our case we need the document and revision ID, the time of deletion and the identity of the person/token who deleted the document (returns the ID), and we also need something human readable. In my case I want to have a title, but since the document types use both title and name I coalesce them. You can also adjust which field values you want to use here.
If you need to include values from other documents you can query them in the document handler.
import { documentEventHandler } from '@sanity/functions'
import { createClient } from '@sanity/client'
import { getPublishedId } from '@sanity/id-utils'

export const handler = documentEventHandler(async ({ context, event }) => {
  const clientOptions = context.clientOptions
  const client = createClient({
    ...clientOptions,
    apiVersion: '2026-01-01',
    requestTagPrefix: 'recycling-bin',
    perspective: 'raw',
    useCdn: false,
  })
    const dataset = clientOptions.dataset


  const { data } = event
  if (!data || !data._id) {
    console.error('No data found.')
    return
  }
  console.group('::: DATA ::: ')
  console.dir(data, { depth: null })
  console.groupEnd()

  const { _id, _type, deletedAt, documentTitle, rev, deletedBy } = data
  const publishedId = getPublishedId(_id)
  // Check if this document was published
  const hasPublishedVersion = await client
    .request({
      method: 'GET',
      uri: `/data/doc/${dataset}/${publishedId}?includeAllVersions=true`,
    })
    .then((res) => {
      console.group(`::: hasPublishedVersion docs ::: `)
      console.dir(res)
      console.groupEnd()
      // return false if both documents
      return res.documents.length > 0
    })
    .catch(console.error)

  if (hasPublishedVersion) {
    console.log(
      `Document has been deleted: ${data._id} but it has other existing versions: ${hasPublishedVersion}`,
    )
    return
  }

  if (!hasPublishedVersion) {
    const idLogPatch = client
      .patch('deletedDocs.bin')
      .setIfMissing({ deletedDocIds: [] })
      .insert('before', 'deletedDocIds[0]', [_id])

    const logPatch = client
      .patch('deletedDocs.bin')
      .setIfMissing({ deletedDocLogs: [] })
      .insert('before', 'deletedDocLogs[0]', [
        {
          docId: _id,
          deletedAt,
          type: _type,
          documentTitle,
          revisionId: rev,
          deletedBy,
          _type: 'log',
        },
      ])
    await client
      .transaction()
      .createIfNotExists({
        _id: 'deletedDocs.bin',
        _type: 'deletedDocs.bin',
        title: 'Bin: Deleted Document Logs',
      })
      .patch(idLogPatch)
      .patch(logPatch)
      .commit({ autoGenerateArrayKeys: true, dryRun: true })
      .then((res) => {
        console.group('Recycling bin logs successfully updated')
        console.dir(res, { depth: null })
        console.groupEnd()
      })
      .catch(console.error)
  }
})
In the code snippet above you can see we run a test using the doc endpoint . This endpoint allows us to circumvent the indexing time which will impact queries, but not this endpoint, making sure our check will not come back with a false negative.
DocumentHandler and resource for cleanUpBinLogs function
Similar to the other function we need to define the blueprint resource and document handler for the cleanup workflow.
// in the resources array add this

defineDocumentFunction({
  name: 'cleanUpBinLogs',
  type: 'sanity.function.document',
  src: './functions/cleanUpBinLogs',
  event: {
    on: ['create'],
    includeDrafts: true,
    includeAllVersions: false,
    filter: '_type in ["language", "listOption", "page"]',
    projection: '{ _id }',
  },
}),
High traffic datasets & drafts
If you have a high traffic dataset you should not enable these functions for drafts.
Since invocations are metered this can ramp up quickly and hit technical limits in our infrastructure. Please make sure to adjust the blueprint resources according to YOUR situation and need!
Since we only have to check if the newly created document or draft is actually a restored one, the _id is enough in the projection.
import { documentEventHandler } from '@sanity/functions'
import { createClient } from '@sanity/client'
import { getPublishedId, isDraftId } from '@sanity/id-utils'

export const handler = documentEventHandler(async ({ context, event }) => {
  const clientOptions = context.clientOptions
  const client = createClient({
    ...clientOptions,
    apiVersion: '2026-01-01',
    requestTagPrefix: 'recycling-bin-cleanup',
    perspective: 'published',
    useCdn: false,
  })
  const { data } = event
  if (!data || !data._id) {
    console.error('No data found. Cannot clean up bin logs.')
    return
  }

  const { _id } = data

  const isDraft = isDraftId(_id)
  const publishedId = getPublishedId(_id)

  // Check if this document was published
  const restoredItemKeys = await client
    .fetch(
      `*[_type == "deletedDocs.bin" && _id == 'deletedDocs.bin'][0].deletedDocLogs[docId in $createdDocIds]._key`,
      { createdDocIds: isDraft ? [_id, publishedId] : [_id] },
    )
    .catch(console.error)

  if (!restoredItemKeys) {
    console.log('No logs exist for:', _id)
    return
  }
  // Clean up the bin logs by removing the document item
  const itemsToUnset = restoredItemKeys.map((key: string) => `deletedDocLogs[_key == "${key}"]`)
  await client
    .patch('deletedDocs.bin')
    .unset(itemsToUnset)
    .commit({dryRun: true})
    .then((res) => {
      console.log(`Cleaned up bin logs for document: ${_id}`)
      console.dir(res)
    })
    .catch((err) => {
      console.error('Error cleaning up bin logs:', err)
    })
})
Test and deploy your blueprint
Now that you have everything in order you can test your functions using the dev console or the CLI (see docs).
If you have been satisfied that your functions work well and don’t cause a loop, you change all commit options in the document handlers to dryRun: false and deploy them to our infrastructure using the CLI.
npx sanity blueprints deploy
pnpm dlx sanity blueprints deploy
yarn dlx sanity blueprints deploy
bunx sanity blueprints deploy
Finished!
Now you are ready to test things in your project.