How to implement front-end search with Sanity
By integrating Sanity's structured content with Algolia, you can provide your users with fast, relevant search results
This developer guide was contributed by Irina Blumenfeld (Solution Architect @ Sanity).
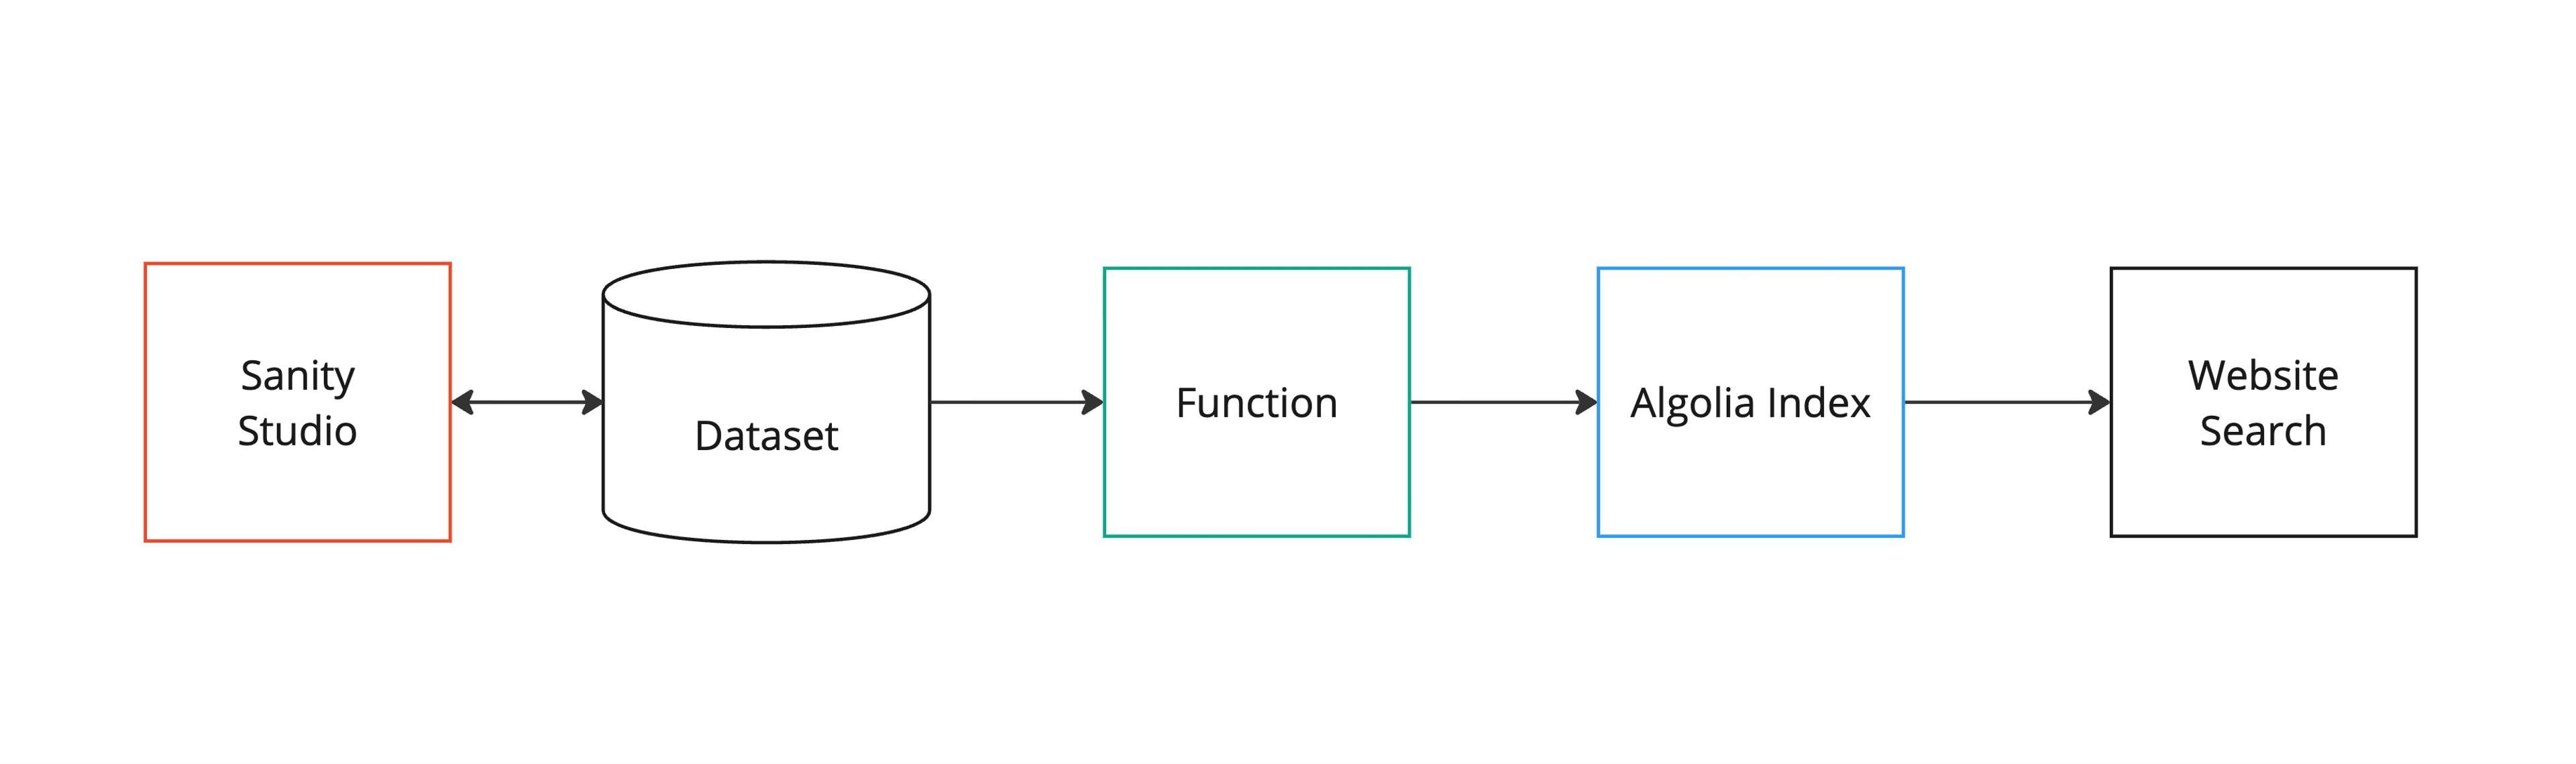
This guide provides a comprehensive walkthrough on integrating Sanity's structured content platform with Algolia's powerful search capabilities using Sanity Functions, and an example front-end implementation using React and Next.js.
It will walk through how to set up indexing of your Sanity content in Algolia v5, including initial indexing of existing content and incremental updates as your content changes.
By following these steps, you can provide your users with fast, relevant search results while leveraging the benefits of Sanity's content platform.
Steps to implement:
- Create schema in Sanity and create Next.js app
- Set up environment variables
- Run a first time indexing script
- Incremental indexing
- Set up and deploy an Algolia sync Sanity Function
- Test the sync function locally
- Customization
- Indexing long records
- Create a front-end search component
- Add
Searchcomponent to your page
If you'd like to see a complete example - View Repo on Github
Create schema in Sanity and create Next.js app
We will be using:
- Clean Next.js + Sanity app template
- Algolia search API client for JavaScript -
algoliasearch - React instant search and React instant search Next.js -
react-instantsearchandreact-instantsearch-nextjs.
Follow the instructions for Clean Next.js + Sanity app template to install and deploy your project.
The template includes a Next.js app with a Sanity Studio – an open-source React application that connects to your Sanity project’s hosted dataset.
Either start with a sample content included with the template, or create your own.
We will make it possible to search the post type documents using Algolia.
The post type has these fields:
{
  _id,
  title,
  slug,
  content,
  coverImage,
  date,
  _createdAt,
  _updatedAt
}
Environment variables
You must add NEXT_PUBLIC_ALGOLIA_APP_ID, NEXT_PUBLIC_ALGOLIA_API_KEY, and ALGOLIA_WRITE_KEY as environment variables in Vercel. You can find these in your Algolia account dashboard.
Algolia comes with a set of predefined API keys. Search API Key works on all your Algolia application indices and is safe to use in your production frontend code. Write API Key is used to create, update and DELETE your indices.
NEXT_PUBLIC_ALGOLIA_APP_ID="your-algolia-app-id"
NEXT_PUBLIC_ALGOLIA_API_KEY="your-algolia-search-api-key"
ALGOLIA_WRITE_KEY="your-private-algolia-key"
First time indexing
If you are indexing for the first time with Algolia, you can add a script within your studio folder and run it locally to do the initial indexing of all the existing content.
Create /scripts directory inside of /studio
Make sure you have these packages installed inside of your /studio directory:
npm install algoliasearch dotenv
pnpm add algoliasearch dotenv
yarn add algoliasearch dotenv
bun add algoliasearch dotenv
Add script
Customization
In this script we query documents with "post" content type. You can modify the query based on the document types and fields you'd like to sync - (e.g. 'articles', 'products', 'events', etc.)
We are also truncating the body size. Algolia has size limits depending on your Algolia plan. Please plan the script accordingly.
// studio/scripts/algolia-initial-sync.ts

import {env} from 'node:process'
import {algoliasearch} from 'algoliasearch'
import {getCliClient} from 'sanity/cli'
import dotenv from 'dotenv'
import path from 'path'

// Load environment variables from .env file in project root
dotenv.config({ path: path.resolve(__dirname, '../../.env') })

const {
  ALGOLIA_APP_ID = '',
  ALGOLIA_WRITE_KEY = '',
} = env

// TODO: Allow this script to run on multiple indexes/post types (e.g. 'posts', 'products', 'events', etc.)
const ALGOLIA_INDEX_NAME = 'posts'

// Get Sanity client using CLI configuration
const sanityClient = getCliClient()

async function initialSync() {
  console.log('Starting initial sync to Algolia...')

  // Validate required environment variables
  if (!ALGOLIA_APP_ID || !ALGOLIA_WRITE_KEY) {
    console.error('Missing required environment variables:')
    console.error('- ALGOLIA_APP_ID:', ALGOLIA_APP_ID ? '✓' : '✗')
    console.error('- ALGOLIA_WRITE_KEY:', ALGOLIA_WRITE_KEY ? '✓' : '✗')
    console.error('')
    console.error('Note: Sanity configuration is automatically loaded from your studio configuration.')
    process.exit(1)
  }

  const algoliaClient = algoliasearch(ALGOLIA_APP_ID, ALGOLIA_WRITE_KEY)

  try {
    // Fetch all post documents from Sanity
    const posts = await sanityClient.fetch(`
      *[_type == "post"] {
        _id,
        title,
        slug,
        "content": pt::text(content),
        _type,
        "coverImage": coverImage.asset->url,
        date,
        _createdAt,
        _updatedAt
      }
    `)

    console.log(`Found ${posts.length} posts to sync`)

    if (posts.length === 0) {
      console.log('No posts found to sync')
      return
    }

    // Prepare documents for Algolia
    const algoliaDocuments = posts.map((post: any) => {
      // Ensure content is within Algolia's size limits (10KB max per record)
      // We'll be more conservative and limit to 8000 characters to leave room for other fields
      const content = post.content ? post.content.slice(0, 8000) : ''

      const document = {
        objectID: post._id,
        title: post.title?.slice(0, 500) || '', // Limit title length
        slug: post.slug?.current || post.slug || '',
        content,
        _type: post._type,
        coverImage: post.coverImage || null,
        date: post.date,
        _createdAt: post._createdAt,
        _updatedAt: post._updatedAt,
      }

      // Check document size and warn if it's getting close to the limit
      const documentSize = JSON.stringify(document).length
      if (documentSize > 9000) {
        console.warn(`Document ${post._id} is ${documentSize} bytes (close to 10KB limit)`)
      }

      return document
    })

    // Clear existing documents in the index to ensure we're overwriting, not appending
    console.log('Clearing existing documents from Algolia index...')
    await algoliaClient.clearObjects({
      indexName: ALGOLIA_INDEX_NAME,
    })

    // Save all documents to Algolia
    console.log('Uploading documents to Algolia...')
    await algoliaClient.saveObjects({
      indexName: ALGOLIA_INDEX_NAME,
      objects: algoliaDocuments,
    })

    console.log('Initial sync to Algolia completed successfully')
    console.log(`Synced ${algoliaDocuments.length} documents to index: ${ALGOLIA_INDEX_NAME}`)
  } catch (error) {
    console.error('Error during initial sync to Algolia:', error)
    process.exit(1)
  }
}

// Run the script if called directly
if (require.main === module) {
  initialSync()
    .then(() => {
      console.log('Script completed successfully')
      process.exit(0)
    })
    .catch((error) => {
      console.error('Script failed:', error)
      process.exit(1)
    })
}

initialSync()
Execute script
npx sanity exec scripts/algolia-initial-sync.ts --with-user-token
pnpm dlx sanity exec scripts/algolia-initial-sync.ts --with-user-token
yarn dlx sanity exec scripts/algolia-initial-sync.ts --with-user-token
bunx sanity exec scripts/algolia-initial-sync.ts --with-user-token
Executing scripts
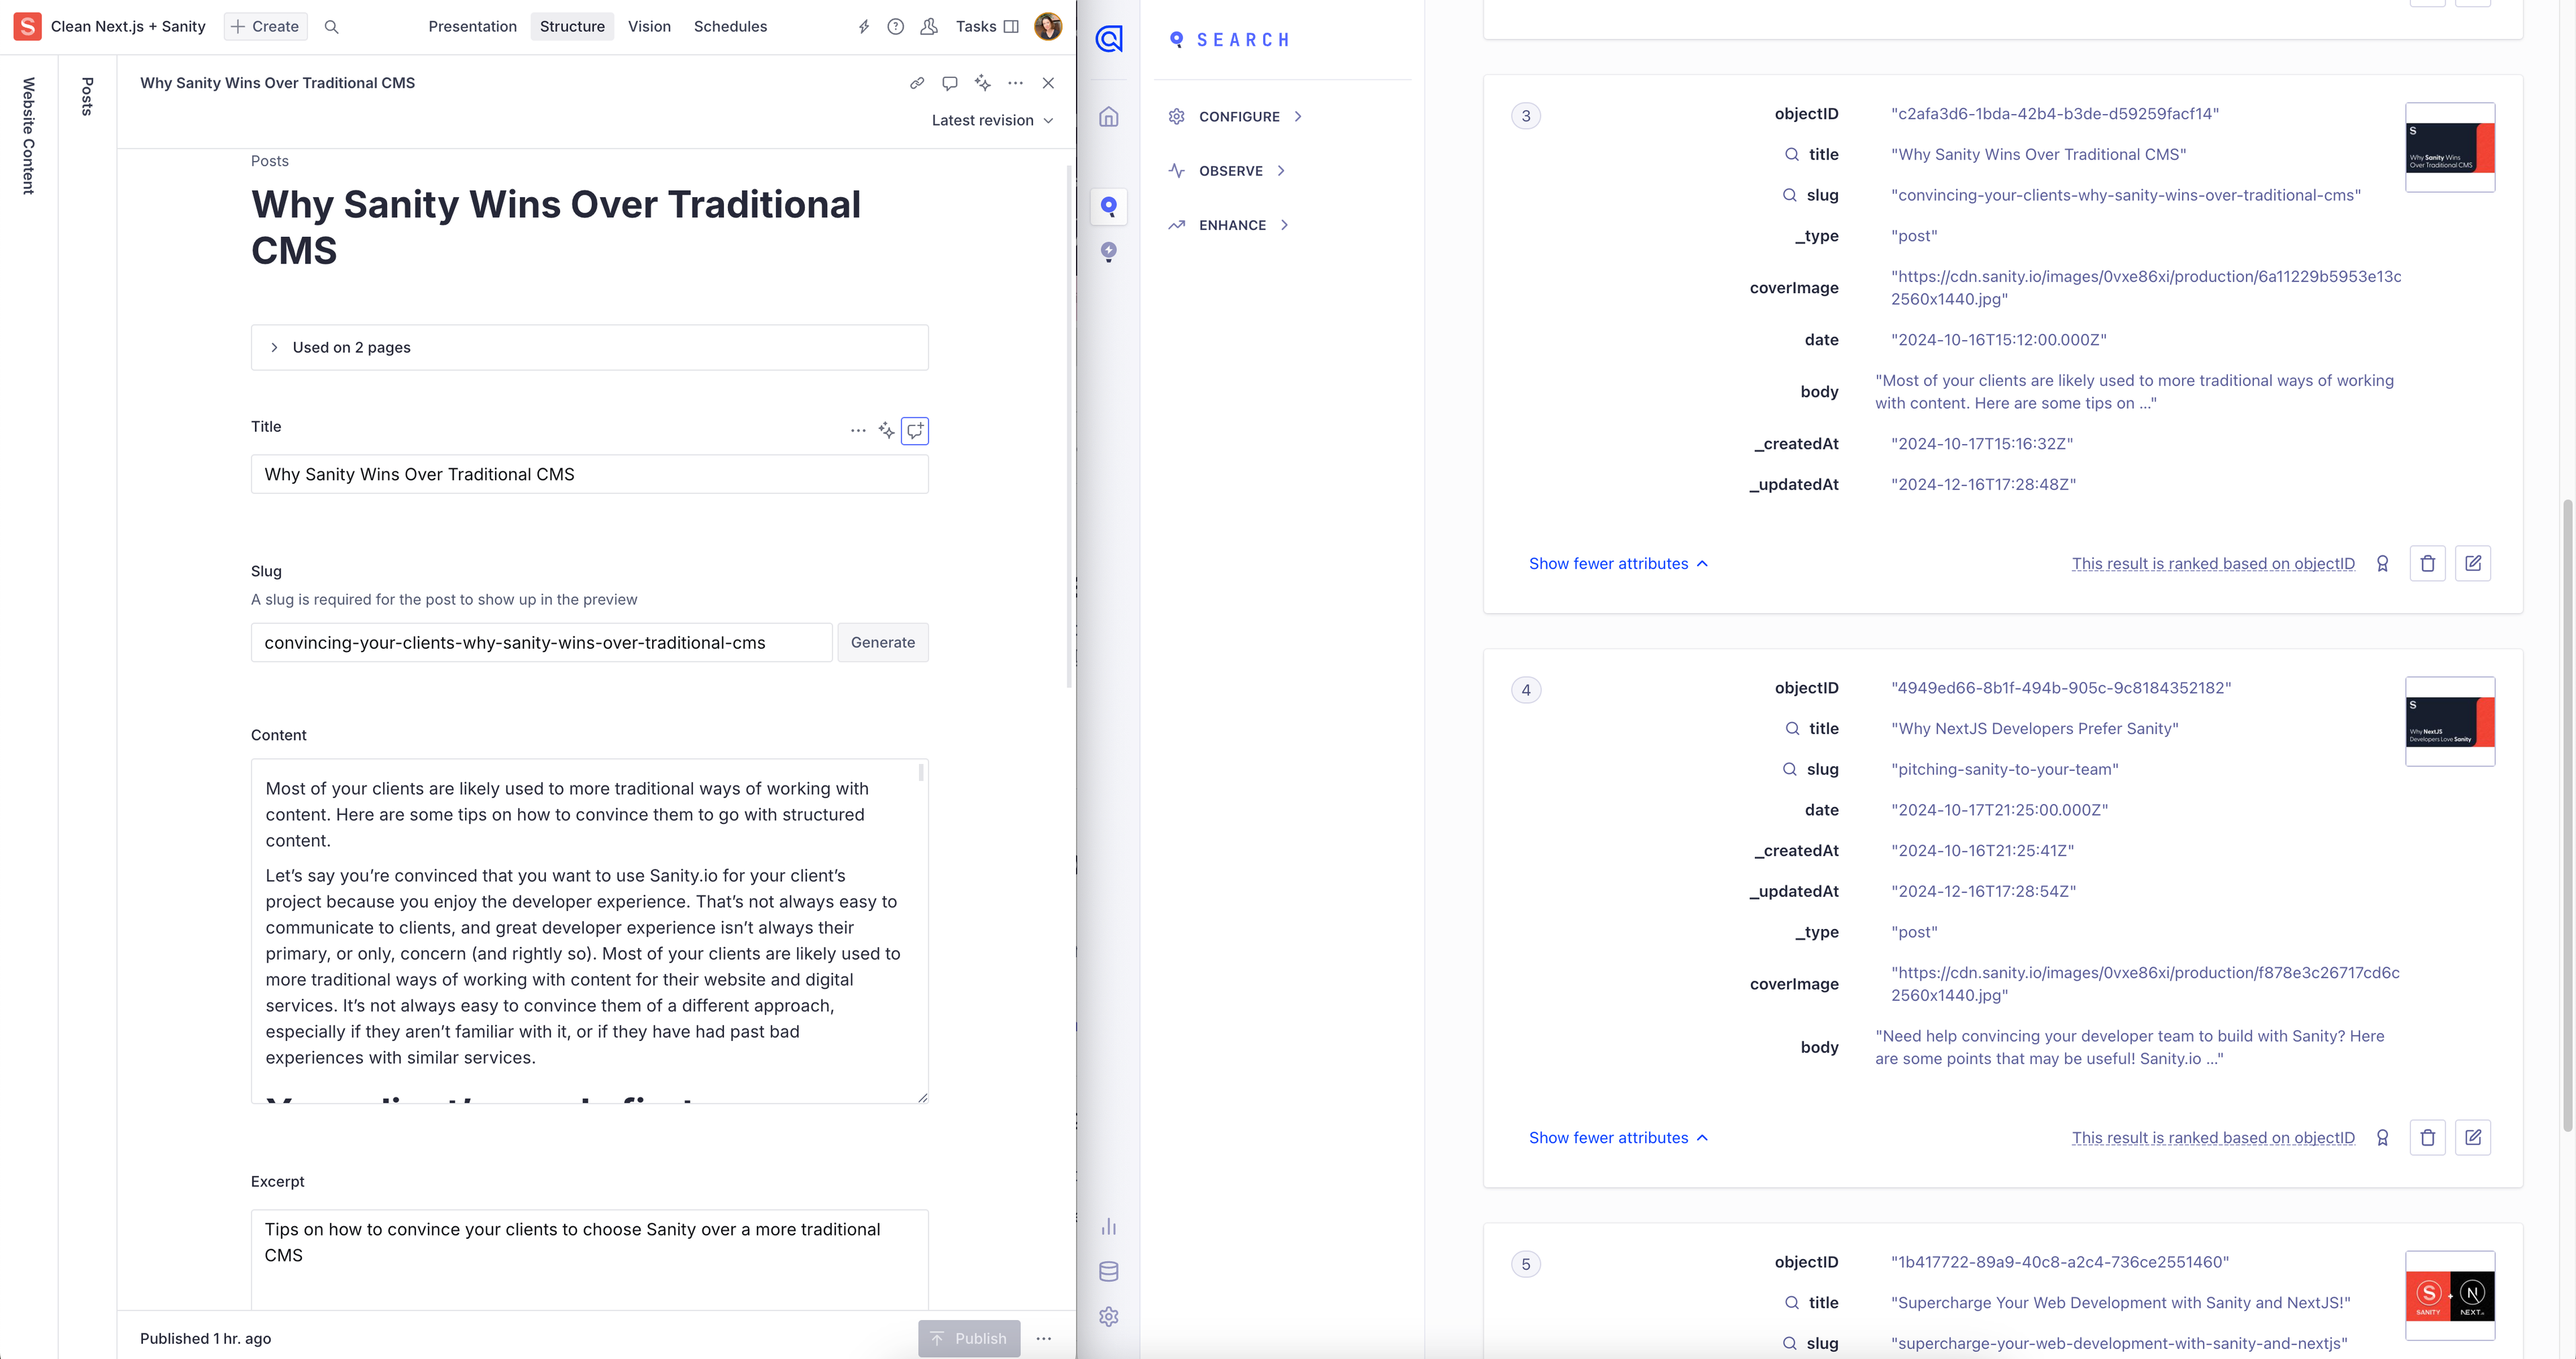
Check the Algolia index
If it synced successfully, your Algolia Application index should now have a number of records based on your query inside the Initial Sync Script.
Incremental indexing
When a content editor publishes, updates or deletes a blog post, the Sanity function that we are setting up below will automatically:
- Trigger on the
create,update,deleteevent forpostdocuments - Extract the document data (
title,ID,coverImage,coverImageAlt,date,slug,_createdAt,_updatedAt,_type. ) - Send the data to Algolia using the Algolia client
- Update the search index with the latest content
Set up and deploy an Algolia Sync Sanity Function
Complete example with code
This Sanity Function automatically syncs documents to Algolia's search index, ensuring your search functionality always reflects your latest content. When a post is published, the function sends the document data to Algolia, either creating a new search record or updating an existing one. We also track when documents are updated and deleted, using the delta operation. Our function can remove an item from Algolia under the delete operation.
Getting Started with Functions
Initialize Blueprints
To create your first function, you need to initialize a blueprint. Blueprints are templates that describe Sanity resources.
Learn More about Blueprints
Prerequisites:
sanityCLI v4.9.0 or higher is recommended to interact with Blueprints and Functions as shown in this guide. You can always run the latest CLI commands withnpx sanity@latest.- Node.js v22.x. We highly suggest working on this version as it is the same version that your functions will run when deployed to Sanity.
- An existing project and a role with Deploy Studio permissions (the
deployStudiogrant).
It's recommended keeping functions and blueprints a level above your Studio directory.
If you're using Clean Next.js + Sanity App template, your project structure may look like this:
main-project-folder/
├─ studio/
├─ frontend/
If you initialize the blueprint in the main-project-folder directory, functions and future resources will live alongside the studio and frontend directory.
npx sanity blueprints init
pnpm dlx sanity blueprints init
yarn dlx sanity blueprints init
bunx sanity blueprints init
You'll be prompted to select your organization and Sanity studio.
Add the Algolia Function example
npx sanity blueprints add function --example algolia-document-sync
pnpm dlx sanity blueprints add function --example algolia-document-sync
yarn dlx sanity blueprints add function --example algolia-document-sync
bunx sanity blueprints add function --example algolia-document-sync
If you followed the directory structure mentioned earlier, you project structure may look like this:
main-project-folder/
├─ studio/
├─ frontend/
├─ sanity.blueprint.ts
├─ package.json
├─ node_modules/
├─ functions/
│  ├─ algolia-document-sync/
│  │  ├─ index.ts
Add configuration to your blueprint
sanity.blueprint.ts already exists in your root directory because you added the algolia-document-sync function example in the previous step.
We will modify it below and add SANITY_PROJECT_ID,SANITY_DATASET environment variables, as well as more document fields inside the projection
// sanity.blueprint.ts

import {defineBlueprint, defineDocumentFunction} from '@sanity/blueprints'
import 'dotenv/config'
import process from 'node:process'

const {
  ALGOLIA_APP_ID,
  ALGOLIA_WRITE_KEY,
  SANITY_PROJECT_ID,
  SANITY_DATASET,
} = process.env

if (typeof ALGOLIA_APP_ID !== 'string' || typeof ALGOLIA_WRITE_KEY !== 'string') {
  throw new Error('ALGOLIA_APP_ID and ALGOLIA_WRITE_KEY must be set')
}

if (typeof SANITY_PROJECT_ID !== 'string' || typeof SANITY_DATASET !== 'string') {
  throw new Error('SANITY_PROJECT_ID and SANITY_DATASET must be set')
}

export default defineBlueprint({
  resources: [
    defineDocumentFunction({
      type: 'sanity.function.document',
      name: 'algolia-document-sync',
      memory: 1,
      timeout: 10,
      src: './functions/algolia-document-sync',
      event: {
        on: ['create', 'update', 'delete'],
        filter: "_type == 'post'",
        projection: `{
          _id,
          title,
          slug,
          "content": pt::text(content),
          _type,
           "coverImage": {
          "assetRef": coverImage.asset._ref,
          "alt": coverImage.alt
          },
          date,
          _createdAt,
          _updatedAt,
          "operation": delta::operation()
        }`,
      },
      env: {
        COMMENT:
          'ALGOLIA_APP_ID and ALGOLIA_WRITE_KEY env variables are required to sync documents to Algolia',
        ALGOLIA_APP_ID,
        ALGOLIA_WRITE_KEY,
        SANITY_PROJECT_ID,
        SANITY_DATASET,
      },
    }),
  ],
})
Install dependencies
Inside your functions/algolia-document-sync directory install @sanity/asset-utils which we'll be using to build the image url from the document image
npm install @sanity/asset-utilspnpm add @sanity/asset-utilsyarn add @sanity/asset-utilsbun add @sanity/asset-utilsIn the project root directory, we need to install dotenv package:
npm install dotenvpnpm add dotenvyarn add dotenvbun add dotenvUpdate your Function
We will modify the Initial Algolia Sync Function script and add additional fields to the query projection, such as coverImage, coverImageAlt, date, slug, _createdAt, _updatedAt, _type. We will also truncate the body and title length. Algolia has size limits depending on your Algolia plan.
// functions/algolia-document-sync/index.ts

import {env} from 'node:process'

import {documentEventHandler} from '@sanity/functions'
import {algoliasearch} from 'algoliasearch'
import {buildImageUrl, parseImageAssetId, isImageAssetId} from '@sanity/asset-utils'

const {
  ALGOLIA_APP_ID = '',
  ALGOLIA_WRITE_KEY = '',
  SANITY_PROJECT_ID = '',
  SANITY_DATASET = '',
} = env

// This example is for 'posts' document type. You can modify it to run on multiple indexes/post types (e.g. 'posts', 'products', 'events', etc.)
const ALGOLIA_INDEX_NAME = 'posts'

const urlFromAssetRef = (assetRef?: string | null) => {
  if (!assetRef || !isImageAssetId(assetRef)) return null
  const parts = parseImageAssetId(assetRef)

  const url = buildImageUrl({
    ...parts,
    projectId: SANITY_PROJECT_ID,
    dataset: SANITY_DATASET,
  })

  return url
}

export const handler = documentEventHandler(async ({event}) => {
  const {_id, title, slug, content, _type, coverImage, date, _createdAt, _updatedAt, operation} =
    event.data

  const algolia = algoliasearch(ALGOLIA_APP_ID, ALGOLIA_WRITE_KEY)
  if (operation === 'delete') {
    try {
      // We are assuming you already have an algolia instance setup with an index called 'posts'
      // addOrUpdateObject documentation: https://www.algolia.com/doc/libraries/javascript/v5/methods/search/delete-object/?client=javascript
      await algolia.deleteObject({
        indexName: ALGOLIA_INDEX_NAME,
        objectID: _id,
      })

      console.log(`Successfully deleted document ${_id} ("${title}") from Algolia`)
    } catch (error) {
      console.error('Error syncing to Algolia:', error)
      throw error
    }
  } else {
    try {
      const coverImageUrl = urlFromAssetRef(coverImage?.assetRef)
      // Truncating the body if it's too long.
      // Another approach: defining multiple records:https://www.algolia.com/doc/guides/sending-and-managing-data/prepare-your-data/how-to/indexing-long-documents/
      const limitedContent = content ? content.slice(0, 8000) : ''
      const limitedTitle = title ? title.slice(0, 500) : ''
      const slugValue = slug?.current || slug || ''

      const document = {
        title: limitedTitle,
        slug: slugValue,
        content: limitedContent,
        _type,
        coverImage: coverImageUrl,
        coverImageAlt: coverImage?.alt ?? '',
        date,
        _createdAt,
        _updatedAt,
      }

      // Check document size and warn if it's getting close to the limit
      const documentSize = JSON.stringify(document).length
      if (documentSize > 9000) {
        console.warn(`Document ${_id} is ${documentSize} bytes (close to 10KB limit)`)
      }

      // We are assuming you already have an algolia instance setup with an index called 'posts'
      // addOrUpdateObject documentation: https://www.algolia.com/doc/libraries/javascript/v5/methods/search/add-or-update-object/?client=javascript
      await algolia.addOrUpdateObject({
        indexName: ALGOLIA_INDEX_NAME,
        objectID: _id,
        body: document,
      })

     const coverImageInfo = coverImageUrl ? `coverImage: ${coverImageUrl}` : 'No cover image'
      console.log(`Synced ${_id} ("${limitedTitle}") – ${coverImageInfo}`)
    } catch (error) {
      console.error('Error syncing to Algolia:', error)
      throw error
    }
  }
})
Deploy a Function
Once you're satisfied that the function works as expected, you can deploy it by deploying the blueprint.
npx sanity blueprints deploy
pnpm dlx sanity blueprints deploy
yarn dlx sanity blueprints deploy
bunx sanity blueprints deploy
You can begin using your function when the deployment is finished. If you set a filter earlier, edit a document that matches it and publish the changes to trigger the function.
If you need to change the function, update your code and re-run the deploy command to push the new changes live.
Functions rate limits
Note that Functions have rate limits to protect against recursive functions limitations and rate limits
Customization
Modify Indexed Fields
Update the fields sent to Algolia by modifying the object in addOrUpdateObject:
// functions/algolia-document-sync/index.ts

const document = {
  // update existing fields
}

await algolia.addOrUpdateObject({
        indexName: ALGOLIA_INDEX_NAME,
        objectID: _id,
        body: document,
      })
Change Target Index
Modify the index name (currently set to 'posts') to sync to a different Algolia index, alternatively pass _type into the projection so you can sync to indexes based on the post type, allowing one function to update many indexes:
// functions/algolia-document-sync/index.ts

await algolia.addOrUpdateObject({
  indexName: 'your-custom-index', // Different index name
  objectID: _id,
  body: {
    title,
  },
})
Add Document Filtering
Update the filter to sync specific document types or conditions:
filter: "_type == 'post' && defined(publishedAt)"
Testing the Function Locally
Functions testing tips
There are several ways you can test your function
Using Sanity CLI
You can test the algolia-document-sync function locally using the Sanity CLI before deploying. To see a full list, see the functions CLI reference documentation or run npx sanity functions test --help.
This function writes directly to Algolia, so we can test locally with our document.json without relying on any Sanity schema.
- Test with the included sample document:
npx sanity functions test algolia-document-sync --file functions/algolia-document-sync/document.json --dataset production --with-user-token
pnpm dlx sanity functions test algolia-document-sync --file functions/algolia-document-sync/document.json --dataset production --with-user-token
yarn dlx sanity functions test algolia-document-sync --file functions/algolia-document-sync/document.json --dataset production --with-user-token
bunx sanity functions test algolia-document-sync --file functions/algolia-document-sync/document.json --dataset production --with-user-token
- Supply data from a document in your dataset
Use the --dataset, --project-id, and --document-id flags to fetch real documents to use as source data for your function.
npm sanity@latest functions test algolia-document-sync --document-id 52df8926-1afe-413b-bd23-e9efbc32cea3 --project-id 123456 --dataset production
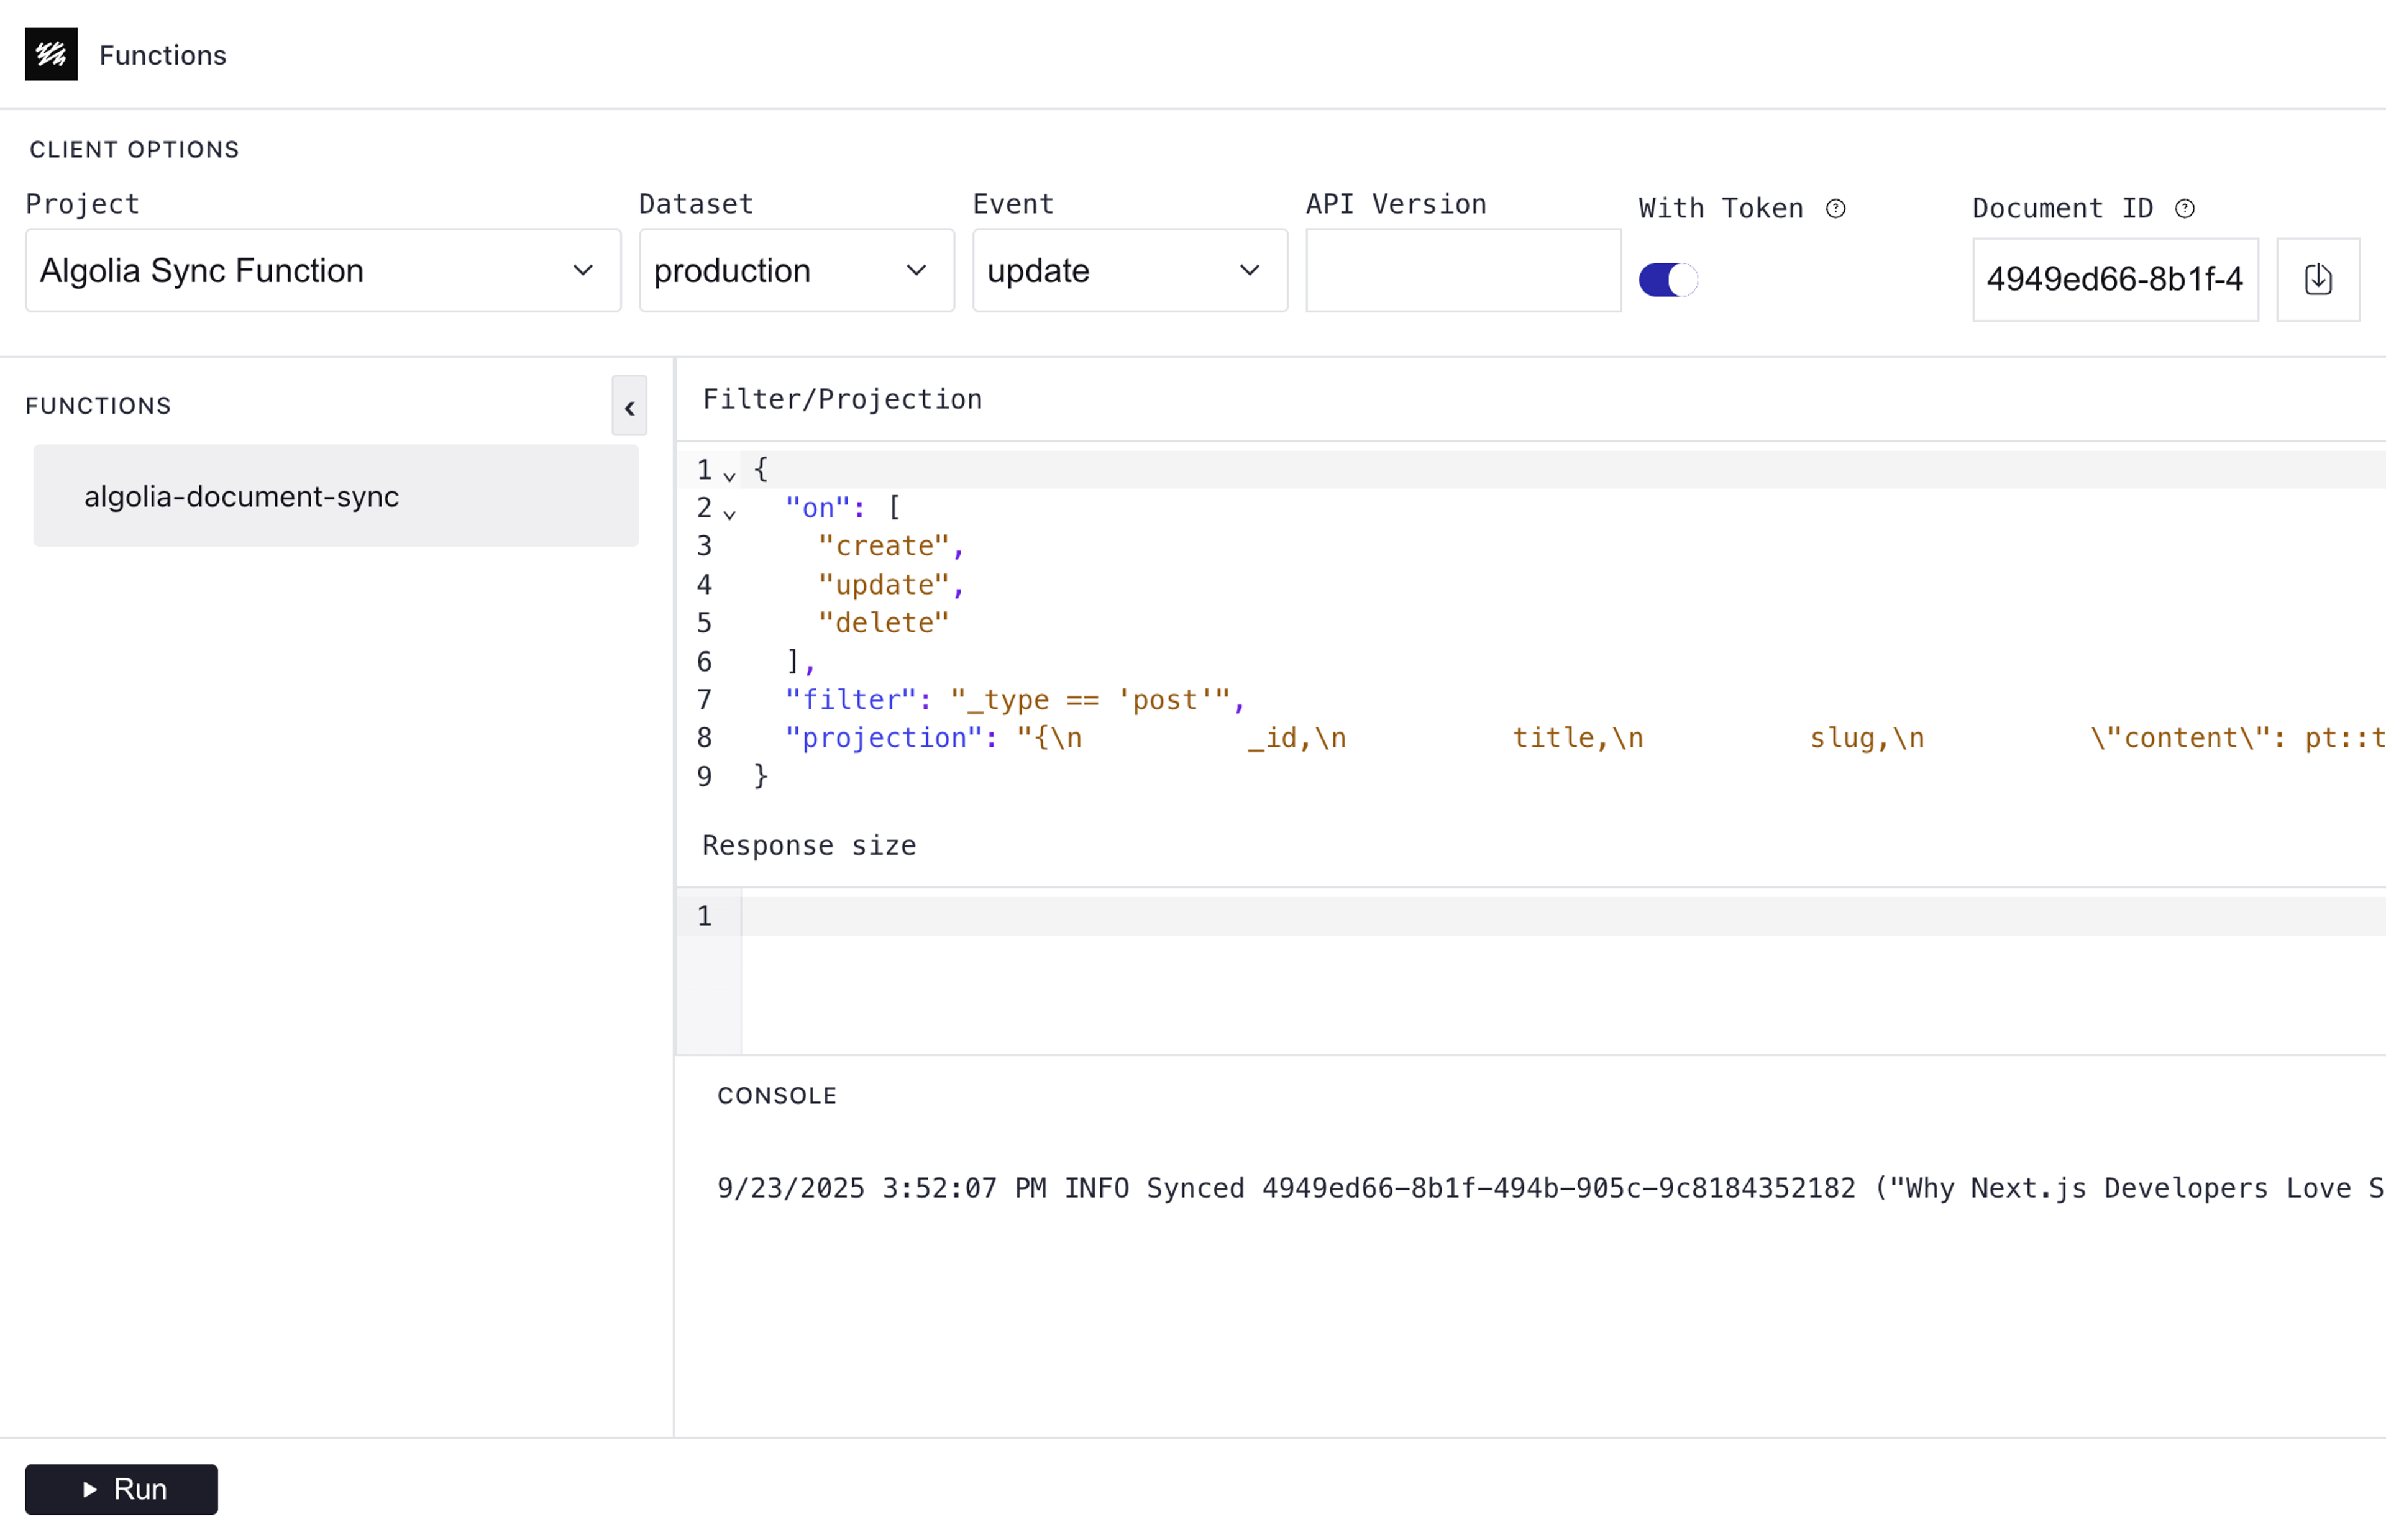
Running local server
The command below opens a local dev server on http://localhost:8080. You can also specify a port with the --port flag.
You need to select project, dataset, Document ID, choose Event, and click Run button to see the results.
- Toggle "With Token" to supply a
tokento the function handler'scontext.clientOptionsobject. A token is omitted from local testing unless this is toggled.
npx sanity functions dev
pnpm dlx sanity functions dev
yarn dlx sanity functions dev
bunx sanity functions dev
Check the Logs
When you tested the function locally, you saw the logs directly in your console. Once deployed, the function and its logs are in the cloud.
npx sanity functions logs algolia-document-sync

INFO Successfully deleted document 77a50e6d-518a-422f-8e04-941c9e464d60 ("This is my test post") from Algolia

INFO Synced 633f34b8-a68c-480a-a2ff-59b8dc168871 (“Really awesome post”) – coverImage: https://cdn.sanity.io/images/e29s7c8p/production/b79d80d029395f5205ce09857644a75cc97fa356-5132x3157.jpg
pnpm dlx sanity functions logs algolia-document-sync
INFO Successfully deleted document 77a50e6d-518a-422f-8e04-941c9e464d60 ("This is my test post") from Algolia
INFO Synced 633f34b8-a68c-480a-a2ff-59b8dc168871 (“Really awesome post”) – coverImage: https://cdn.sanity.io/images/e29s7c8p/production/b79d80d029395f5205ce09857644a75cc97fa356-5132x3157.jpgyarn dlx sanity functions logs algolia-document-sync
INFO Successfully deleted document 77a50e6d-518a-422f-8e04-941c9e464d60 ("This is my test post") from Algolia
INFO Synced 633f34b8-a68c-480a-a2ff-59b8dc168871 (“Really awesome post”) – coverImage: https://cdn.sanity.io/images/e29s7c8p/production/b79d80d029395f5205ce09857644a75cc97fa356-5132x3157.jpgbunx sanity functions logs algolia-document-sync
INFO Successfully deleted document 77a50e6d-518a-422f-8e04-941c9e464d60 ("This is my test post") from Algolia
INFO Synced 633f34b8-a68c-480a-a2ff-59b8dc168871 (“Really awesome post”) – coverImage: https://cdn.sanity.io/images/e29s7c8p/production/b79d80d029395f5205ce09857644a75cc97fa356-5132x3157.jpgThe above command outputs the function's logs. Try updating your document, publishing the change, and running the command again to see new logs.
Indexing long records
Your Algolia plan has limits on the number of records and the size of records you can import. If you exceed these limits, you might get an error: Algolia error: Record too big.
To work around this Algolia suggests to break the page into sections or even paragraphs, and store each as a separate record. When you split a page, the same content might appear in multiple records. To avoid duplicates, you can turn on distinct and set attributeForDistinct.
Algolia provides documentation on indexing long documents
Create a Front-end Search Component
In your frontend directory, you will need to install react-instantsearch and react-instantsearch-nextjs packages.
npm install react-instantsearch react-instantsearch-nextjs
pnpm add react-instantsearch react-instantsearch-nextjs
yarn add react-instantsearch react-instantsearch-nextjs
bun add react-instantsearch react-instantsearch-nextjs
Algolia provides a detailed documentation on implementing Search in your React Application.
In the /app/components directory add a new file Search.tsx
Make sure to use the Search API Key provided by Algolia - a public API key which can be safely used in your frontend.
// app/components/Search.tsx

'use client';
import { liteClient as algoliasearch } from 'algoliasearch/lite';
import { SearchBox, Hits, useSearchBox } from 'react-instantsearch';
import { InstantSearchNext } from 'react-instantsearch-nextjs';
import Link from 'next/link';

const algoliaAppId = process.env.NEXT_PUBLIC_ALGOLIA_APP_ID!;
const algoliaApiKey = process.env.NEXT_PUBLIC_ALGOLIA_API_KEY!;

const searchClient = algoliasearch(algoliaAppId, algoliaApiKey);

function SearchResults() {
    const { query } = useSearchBox();

    if (!query) {
        return null;
    }

    return (
        <div className="text-left">
            <h2 className="text-2xl font-semibold mb-4">Results for: {query}</h2>
            <Hits
                hitComponent={({ hit }) => (
                    <div className="p-2 border-b">
                        <Link href={`/posts/${hit.slug}`}
                            passHref
                            className="text-blue-600 hover:text-blue-700 hover:underline">
                            {hit.title}
                        </Link>
                        <p>{hit.description}</p>
                    </div>
                )}
            />
        </div>
    );
}

export function Search() {
    return (
        <InstantSearchNext
            indexName="posts"
            searchClient={searchClient}
            ignoreMultipleHooksWarning={true}
            future={{ preserveSharedStateOnUnmount: true }}
            routing={{
                router: {
                    cleanUrlOnDispose: false,
                    windowTitle(routeState) {
                        const indexState = routeState.indexName || {};
                        return indexState.query
                            ? `MyWebsite - Results for: ${indexState.query}`
                            : 'MyWebsite - Results page';
                    },
                }
            }}
        >
            {/* SearchBox for input */}
            <SearchBox
                placeholder="Search for items..."
                classNames={{
                    input: `
                      border-2 border-gray-500 rounded-lg
                      p-3 m-2 w-full max-w-2xl mx-auto
                      text-lg
                      focus:border-blue-500 focus:ring-2 focus:ring-blue-400
                      shadow-sm
                    `,
                    submit: 'hidden',
                    reset: 'hidden',
                }}
            />

            {/* Search results component */}
            <SearchResults />
        </InstantSearchNext>
    );
}
Add the Search Component to the Page
Add your Search to the front-end component in your site.
In our example we'll add it to the main page in /app/page.tsx
// /app/page.tsx

... rest of the imports
import { Search } from "@/app/components/Search";

... page content

<Search />

... page content
Run your frontend project and test to make sure you're getting search results:
npm run devpnpm run devyarn run devbun run devAlgolia provides documentation on refining your search results, such as adding filters, synonyms, sorting strategies, search analytics, and more.
Front-end Implementation Demo
The example code in this guide can be found in https://github.com/sanity-io/sanity-algolia-sync
Live Demo: https://sanity-algolia-sync-one.sanity.dev
Conclusion
- By integrating Sanity and Algolia, you can provide powerful search capabilities for your content. This guide walked through the steps to set up indexing of your Sanity content in Algolia, including:
- Initial indexing in Algolia with a CLI script
- Deploying a Sanity function to handle
create,update,deletedocument events - Setting up Algolia search in your front-end application and using the Algolia JavaScript API client to send search queries and display the results.